Dockmaster Mobile Time App Guide
Important Note: DockMaster Mobile Time Functions can be used on the Android and the iOS platforms. iOS 11 or later. Android 8.0 or later. This manual is relevant to both platforms.
GETTING STARTED
Welcome to the DockMaster Mobile App User Guide. This document will provide information on setup, logging in and using the mobile app. If you have any questions or need assistance, always feel free to email [email protected] Using a Wi-Fi or cellular data enabled iOS or Android device: • Download the DockMaster Mobile App from the App Store or Google Play Store
TECHNICIAN MAINTENANCE
The DockMaster Mobile App requires a Technician ID and password to login. To setup or modify a technician, go to: • DockMaster>File Maintenance>Technicians

To display a list of active technicians, right-click the Technician ID field, and select list active.
If you do not see the technician(s) you want to add, close the active list, and enter type a numeric value (up to five characters) and press enter. This will allow you to create a new Technician file.
Note: if this is a new employee, you will need to setup the user profile in:
• System Administration>Security>Clerks
After the Technician ID has been entered, the Miscellaneous section will be available to edit. Make sure the Name, Password and Department fields are correct, then save.

SERVICE SCHEDULE SETUP(optional)
The Service Schedule is a Calendar function in DockMaster that allows you to assign OpCodes to technicians for work to be performed. The Calendar offers color coding and custom labels that are created/managed in the Service Schedule. **Service Scheduler is Not necessary for DM Mobile.
Note: You must have the proper permission assigned to your clerk to view or edit this menu item.
To setup the Service Schedule, go to: DockMaster>System Administration>Configuration>Service Schedule. Select the Location code and the Schedule Calendar tab will open.
Select the Year from the drop down and the remaining fields will be available to edit.
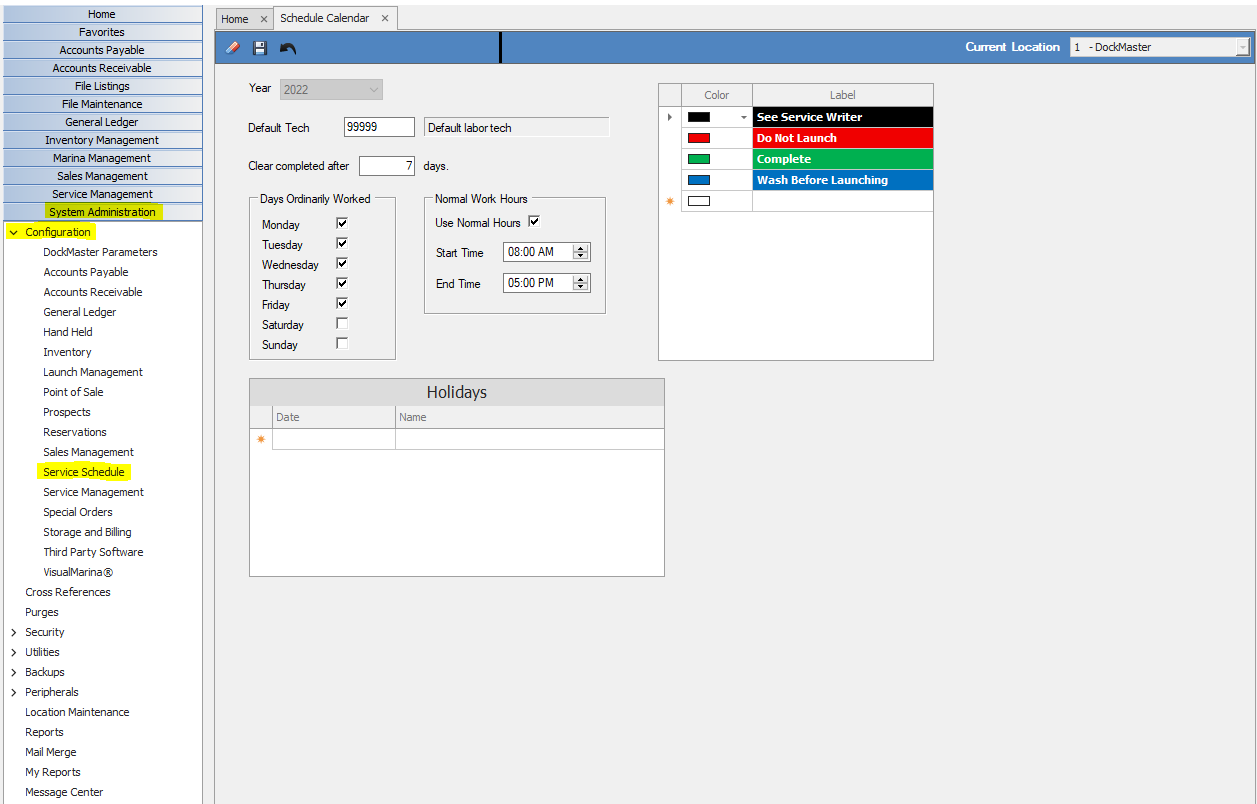
- Default Tech – Enter the default labor technician for your service department
- Clear Completed After # Days – Removes completed task from Schedule after # days
- Days Ordinarily Worked – The days of the week the service department operates
- Normal Work Hours – The normal working hours the service department operates
- Holidays – Any Holidays that the service department is closed
- Color and Label field – Custom color and label field that is designated for service work
- After you have edited the fields, make sure to select the Save Icon before closing the tab.
CREATING A PROFILE
After downloading the DockMaster Mobile App to your device(s), and you have opened the app, the log in screen displays without any credentials. You will see on this screen a:
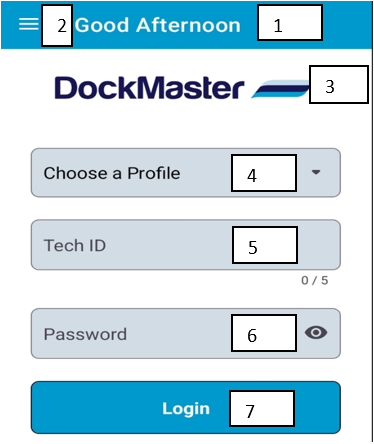
- Salutation
- Settings Icon – Allows you to add or update a profile
- DockMaster logo
- Choose a Profile – This is the name you choose to give to this log in profile. It is possible to have more than one profile if you work for several locations/companies.
- Tech ID – Your Tech ID from DockMaster
- Password – Your Password from your Tech ID in DockMaster
- Log In Button
To log in, a profile is required. To setup a new profile, click on the Settings icon, at the top left of the log in screen.

On the screen that opens, click the Profiles link on the left of the pop-out menu.
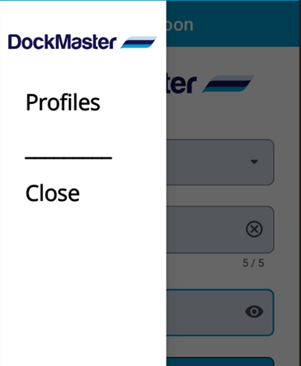
PROFILE SETTINGS
After click Profiles, the following screen will appear. Select the New icon at the top right of the Profile Settings screen to edit the profile fields.
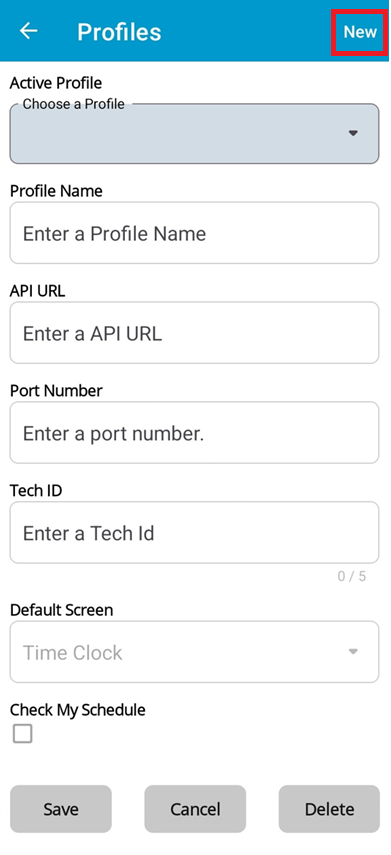
- Active Profile – Will be blank at this time.
- Profile Name – Marina Name and/or location is suggested.
- API URL – Specific API URL provided by Support.
- Port Number – Specific Port Number provided Support.
- Tech ID – Specific to the technician that will use device.
- Default Screen – Select the Time Clock (a timer) or Time Entry (entering amount of time worked) as the default method of tracking time worked on an opcode.
- Note: Your tech ID must be granted access, by your supervisor, to either the Time Clock method or the Time Entry method, or both.
- Check My Schedule – If this box is checked, the first screen will display the appointments assigned to you for the current day.
Note: For multiple locations, you will follow these steps to setup each profile per location.
DockMaster Support will send a Welcome Email with the API URL and Port Number that will need to be entered into these fields during the setup process.
After the fields have been entered, you will select Save. The Profile Settings screen will return to the blank form. To return to the Log In Screen, Click the Back button at the top left.
LOGGING IN
After one or more profiles have been created, select the appropriate profile to log in to. If there is only one profile created the log in screen will auto-populate with the profile name and tech id.
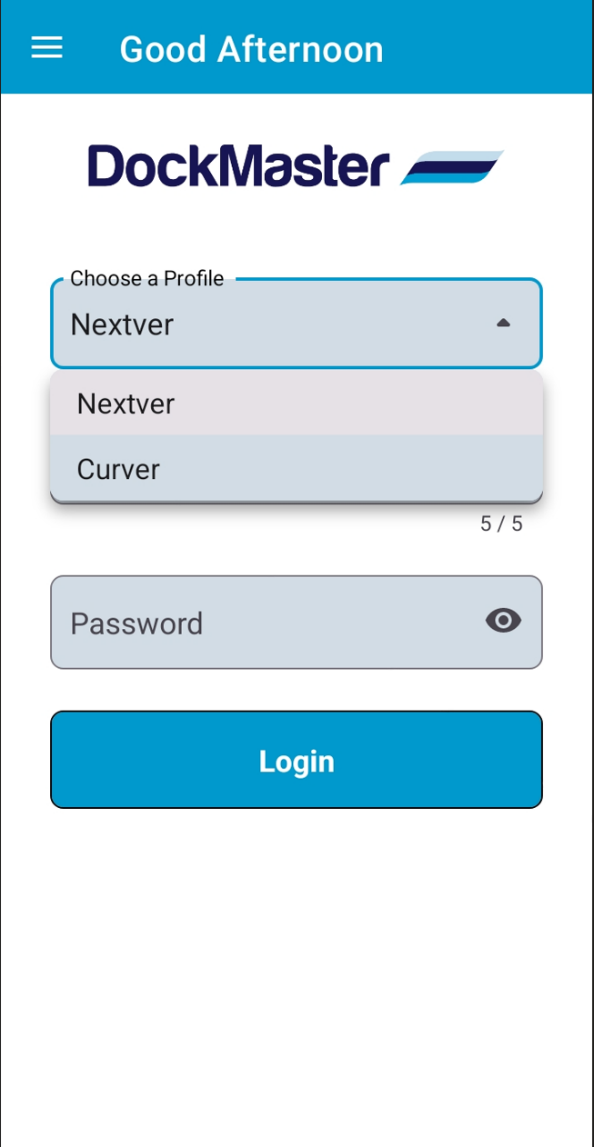
If there is more than one profile set up, click on the Profile name field on the log in screen to select the Profile to log in to.

After you have selected the Profile, enter the password associated with the tech id that was setup in Technician Maintenance in DockMaster.
Select either Enter on your keyboard or press the Log In button, which will take you to the Default screen that was setup in the Profile.
Note: If you receive any error messages, please email [email protected] for assistance.
LOGGED IN MY SCHEDULE
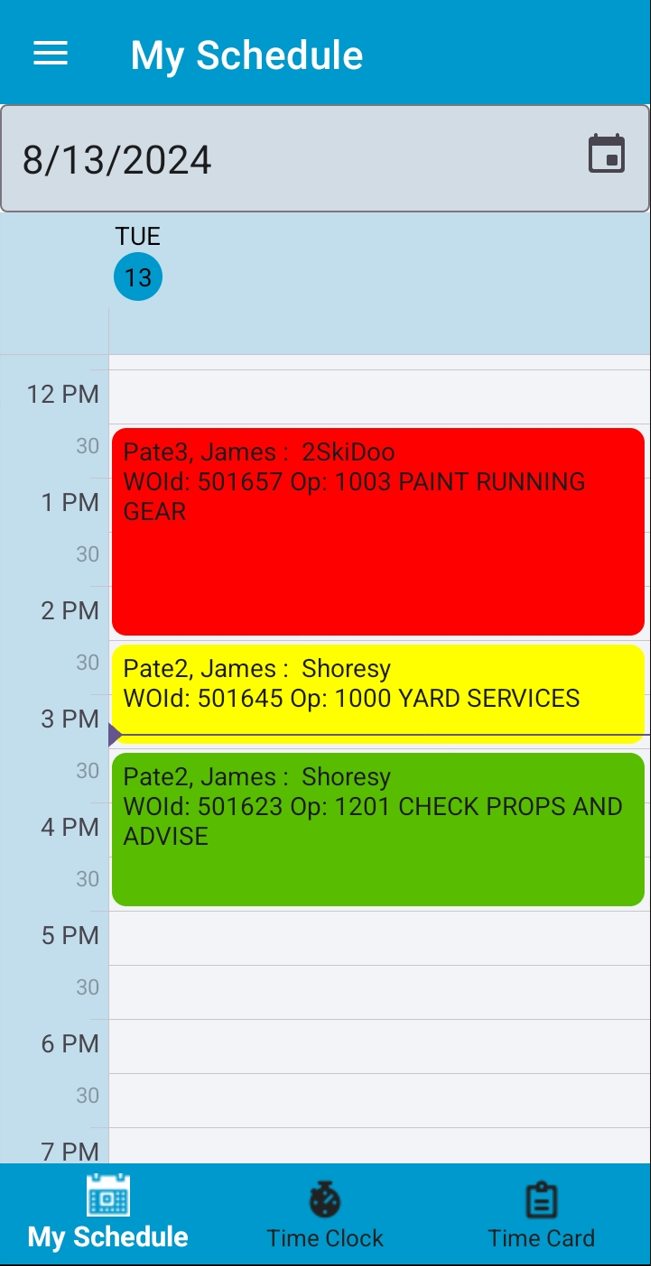
Now that you have logged in, if the My Schedule toggle was on in the profile setup screen, the screen will default to My Schedule. This screen will provide any OpCodes assigned to you for the current day.
NAVIGATING DOCKMASTER MOBILE
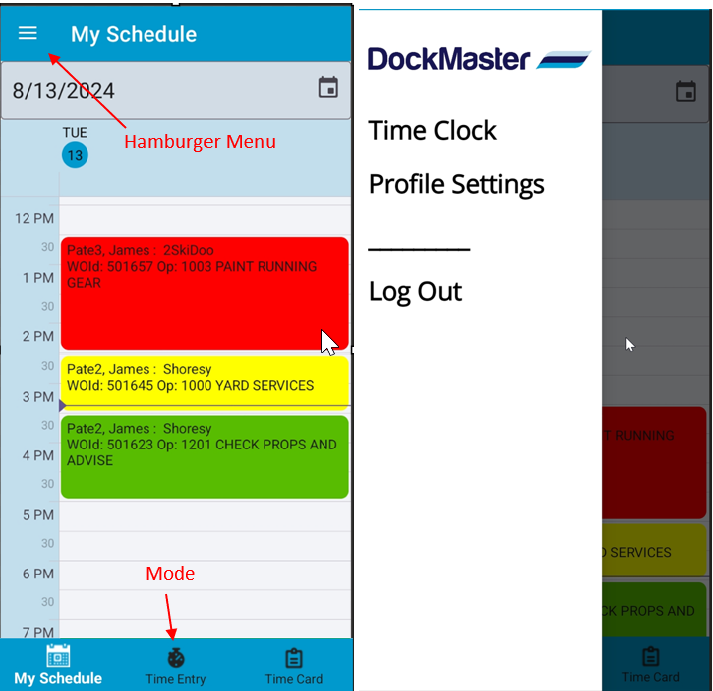
After logging In, the display you will see will vary depending on the set up in your Profile. The first thing you will see will be either the Time Clock form or the Time Entry form or the My Schedule Form. There will also be several icons that you can select.
If the first screen display is My Schedule, you will see the following:
- Menu – 3 small horizontal bars top left.
- Time Clock (if your Tech ID is configured by your manager to use Time Clock)
- Time Entry (if your Tech ID is configured by your manager to use Time Entry)
- Profile Settings
- Log Out
- Date Field – defaults to current date, and can be changed to previous or future dates
- My Schedule Icon – to view which OpCodes have been assigned to you on date selected
- Time Entry – Allows you to search for Work Order, then OpCode to key in hours
- Time Card – OpCode time entries and notes are displayed here. Information can be edited or deleted
While in Time Clock you can access Time Entry from the Main Menu.
SERVICE SCHEDULE(optional)
In DockMaster you can assign work to be performed to the technician from the OpCode screen, which will populate on the mobile app once the technician logs in. **Service Scheduler is Not necessary for DM Mobile.
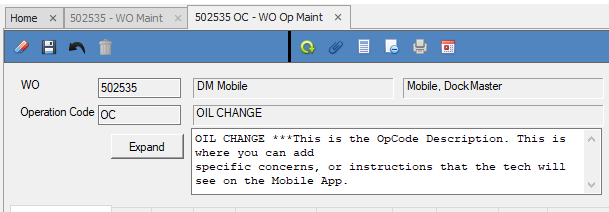
Once the OpCode has been entered and saved, select the Calendar Icon. The Service Schedule tab will open with a calendar view of today by default.
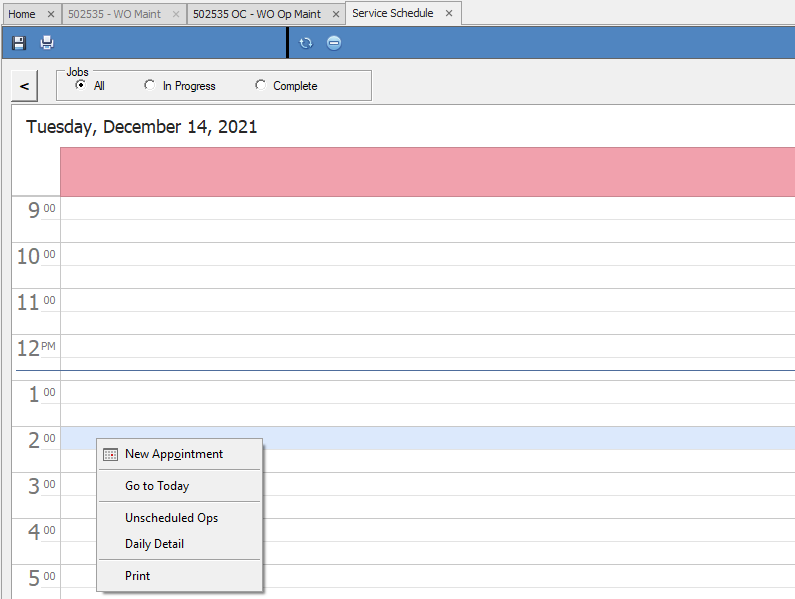
Right-click the time slot you want to schedule the appointment and select “New Appointment”. The edit schedule screen will open based on the OpCode you navigated from. If the fields are blank, you can search by the Work Order number to schedule.
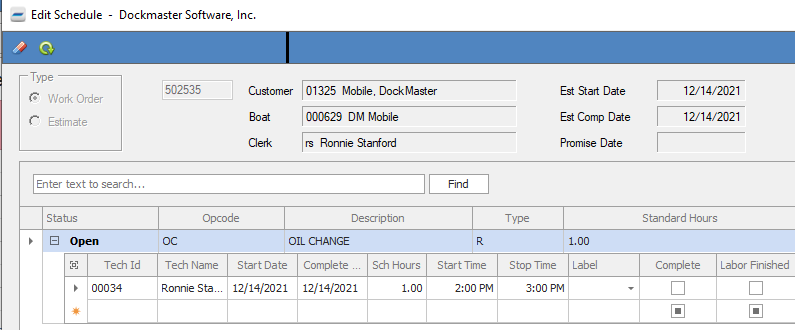
Under the Tech ID field, enter the tech that will perform the work and select the green update button at the top of the screen and then close the tab. The Service Schedule tab will update with the information, and you will select Save to confirm the schedule.
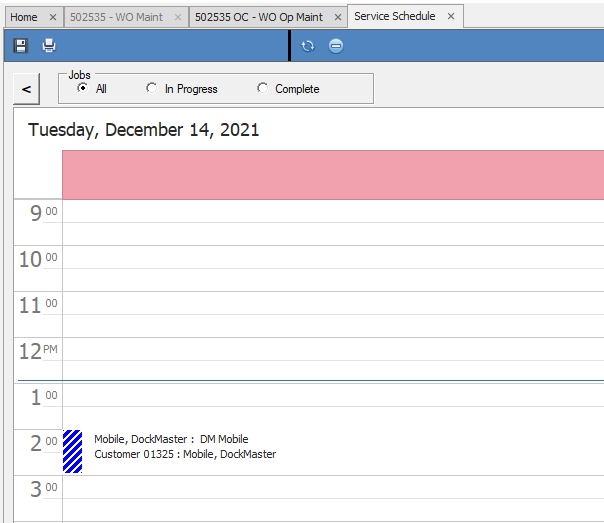
MY SCHEDULE
In the DockMaster Mobile App, the My Schedule icon is at the bottom left. This allows you to see what has been scheduled and assigned for the technician to work on.
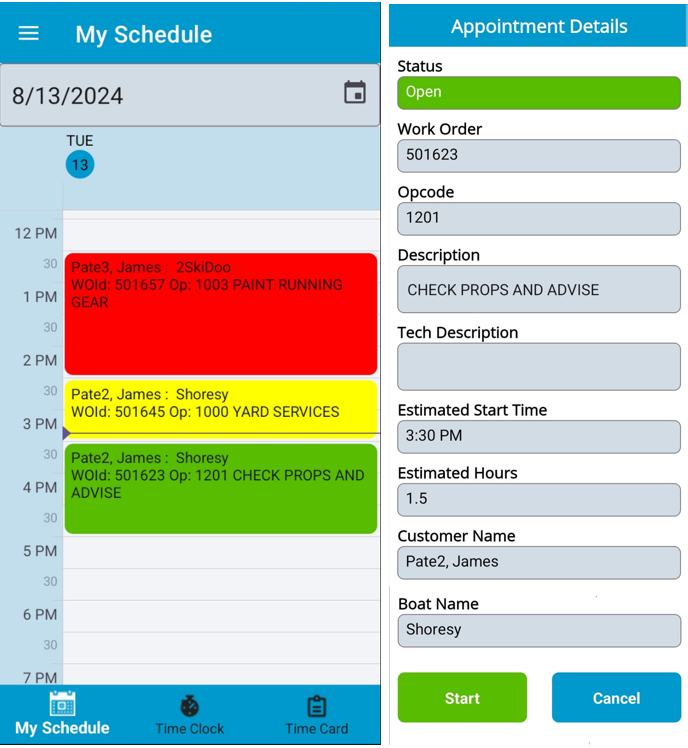
On the My Schedule screen you will see color coded OpCodes depending on status: Green – Items ready for work. Simply click on the item to get to Appointment Details, from there you can click Start to continue the job. Yellow – Items currently being worked or Clocked In. Red – Items Completed. **Please remember, the results of My Schedule are driven by the date field on this screen and will only show result based on the date and what was assigned for that date in Service Schedule.
WORK ORDER SEARCH
The technician may need to search for a Work Order and OpCode if the OpCode has not been assigned and scheduled through Service Schedule.
To search for a Work Order, select the Time Clock/Time Entry Icon at the bottom middle of the app.
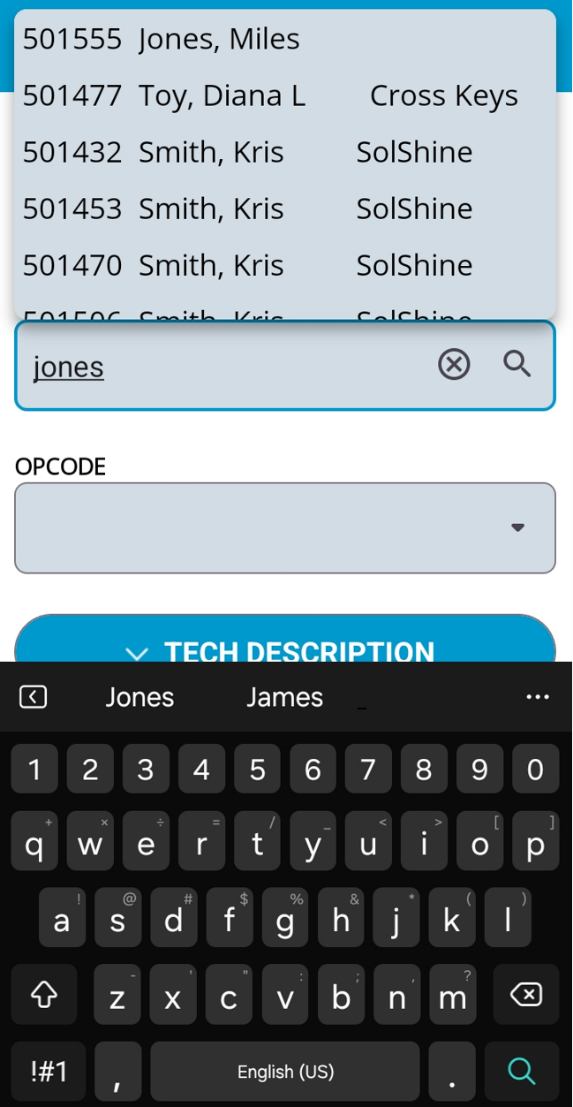
A Work order must be selected before searching for OpCode. You begin by keying your search characters into the work order field and it will start to populate a list of options. You can scroll through this list if needed. Tap on the work order you want, i.e. Customer last name, boat name, etc.
Direct Work Order numbers can be typed in then hitting the Find or Search
key will enter them.
Currently, all open work orders will be displayed upon performing a search.
Note: Technicians can only select ONE Work Order and ONE OpCode at a time to clock into.
Once the Work Order has been selected you will need to search for the OpCode.
OPCODE SEARCH
After the Work Order has been selected, you can select the OpCode field search icon. OpCodes associated with that work order will populate and the technician will select the OpCode they are going to perform.
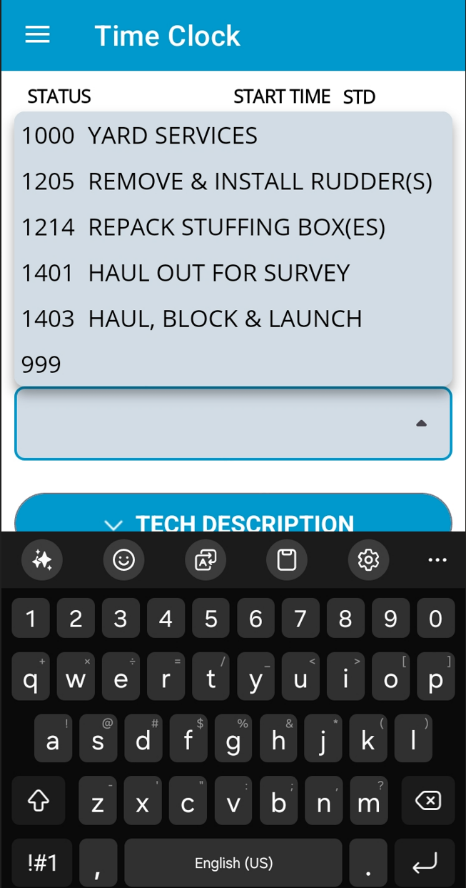
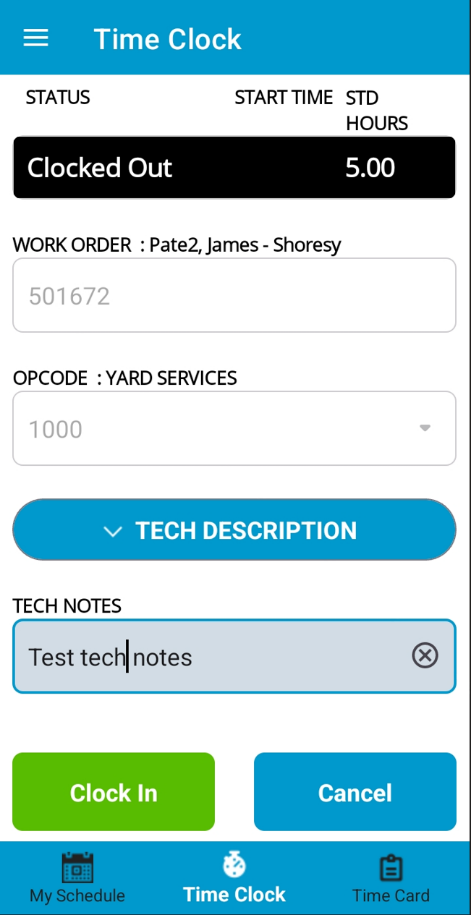
Note: The OpCode that is selected will show the STD Hours (standard hours) that it should take to perform the work for the OpCode, if the STD hours is entered on the opcode in the work order.
After the Work Order and OpCode have been selected the Technician will select Clock In to begin tracking time while work is done.
OPCODE NOTES
The OpCode Notes and Tech notes to the Technician will be visible from the My Schedule screen for OpCodes that have been assigned to the Technician. Click on the scheduled item to get to Appointment Details.
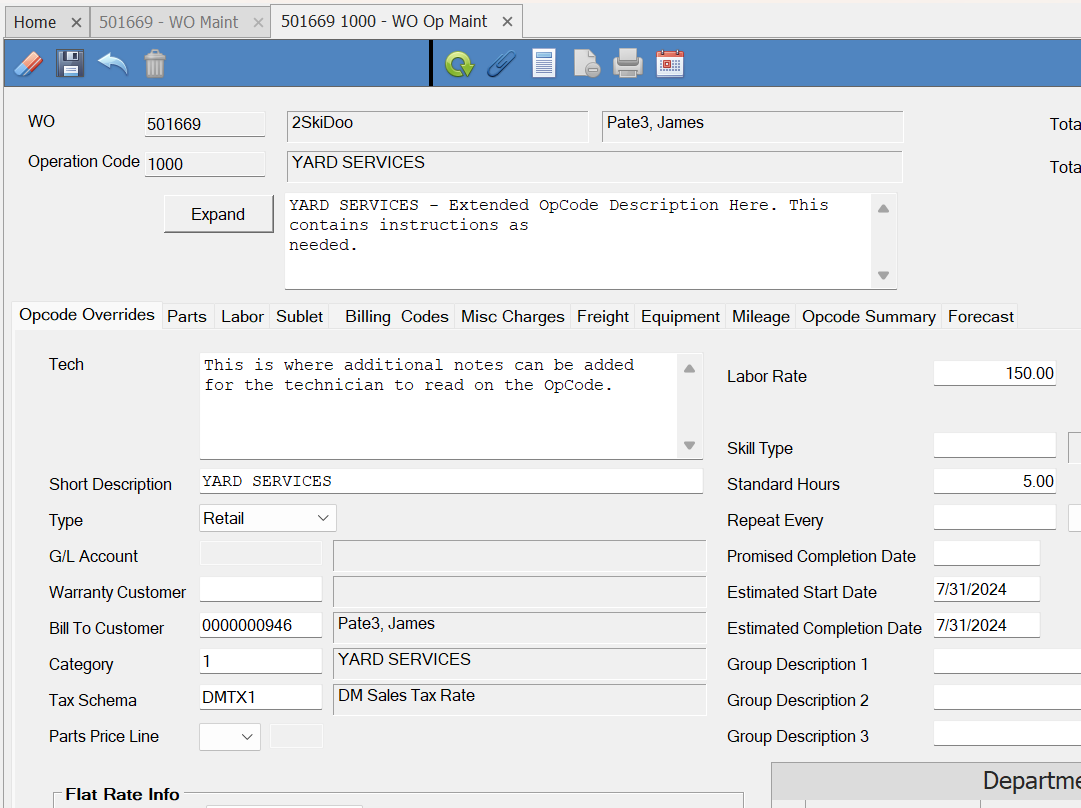
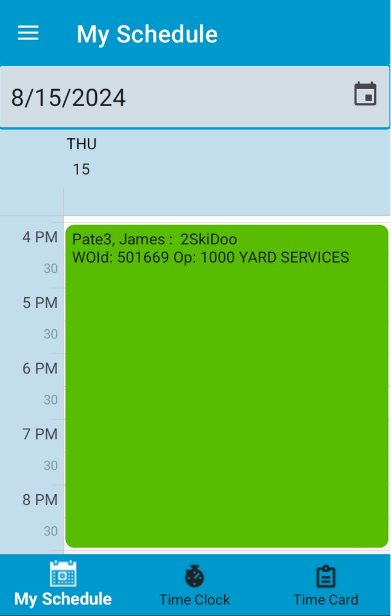
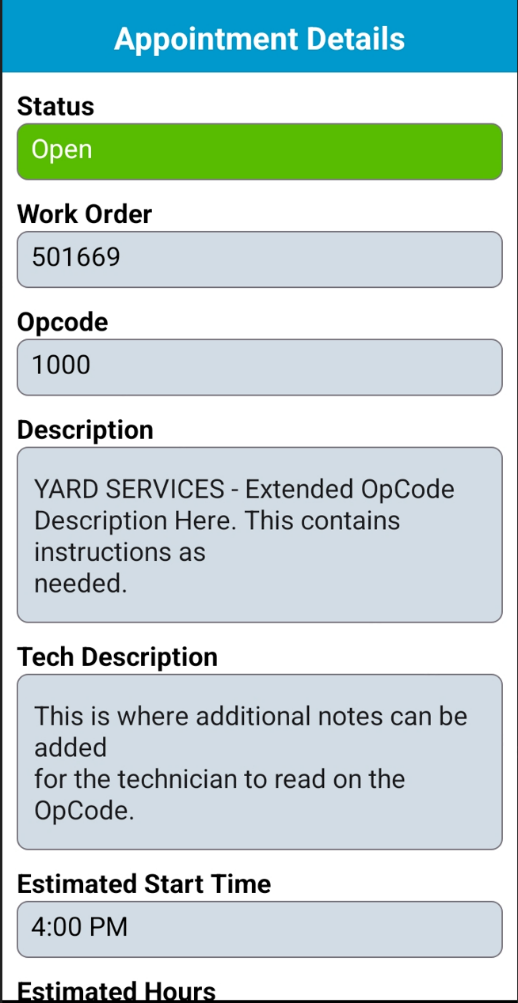
Technician notes can be added to an OpCode at any time.
If your mobile device support voice to text, notes can be spoken into the notes field on the display. Please consult the user manual for your device to configure voice to text.
To manually type notes, clicking into the Notes field will initiate the keyboard on your mobile device. Begin typing to create the notes for the selected OpCode
NAVIGATING TIME FUNCTIONS
This section will provide an overview of the Time Functions, including how to use Time Clock to clock into an appointment, Time Entry to key in hours performed, and the Time Card where entries can be displayed, edited or deleted.
TIME CLOCK
Once the Work Order and OpCode have been selected from the Time Clock menu, select the Clock In button to begin tracking time while work is done for the OpCode.
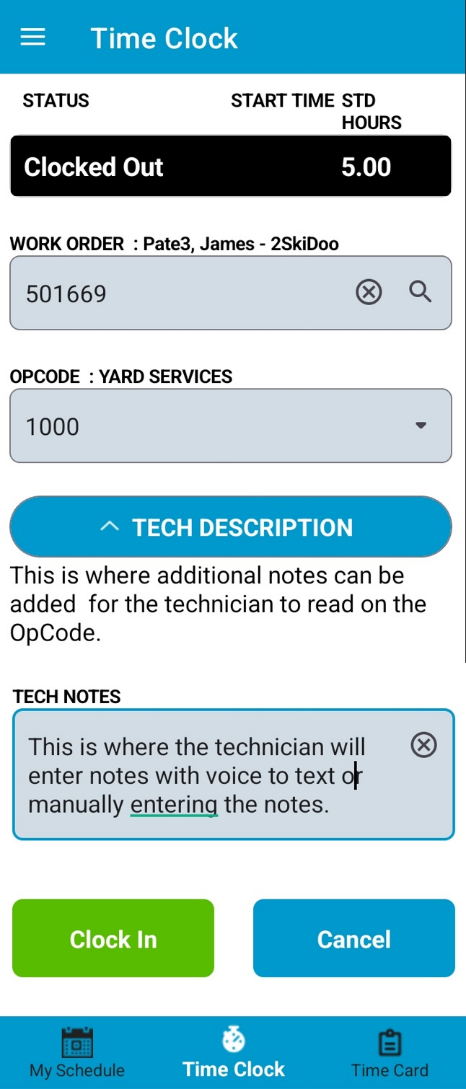
After selecting Clock in the Status will change from Clocked Out to Clocked In. The Technician will be able to enter notes in the Notes section of any information he/she feels is notable during the service.
Note: The Technician can close out of DockMaster Mobile and it will not affect the clocked in status.
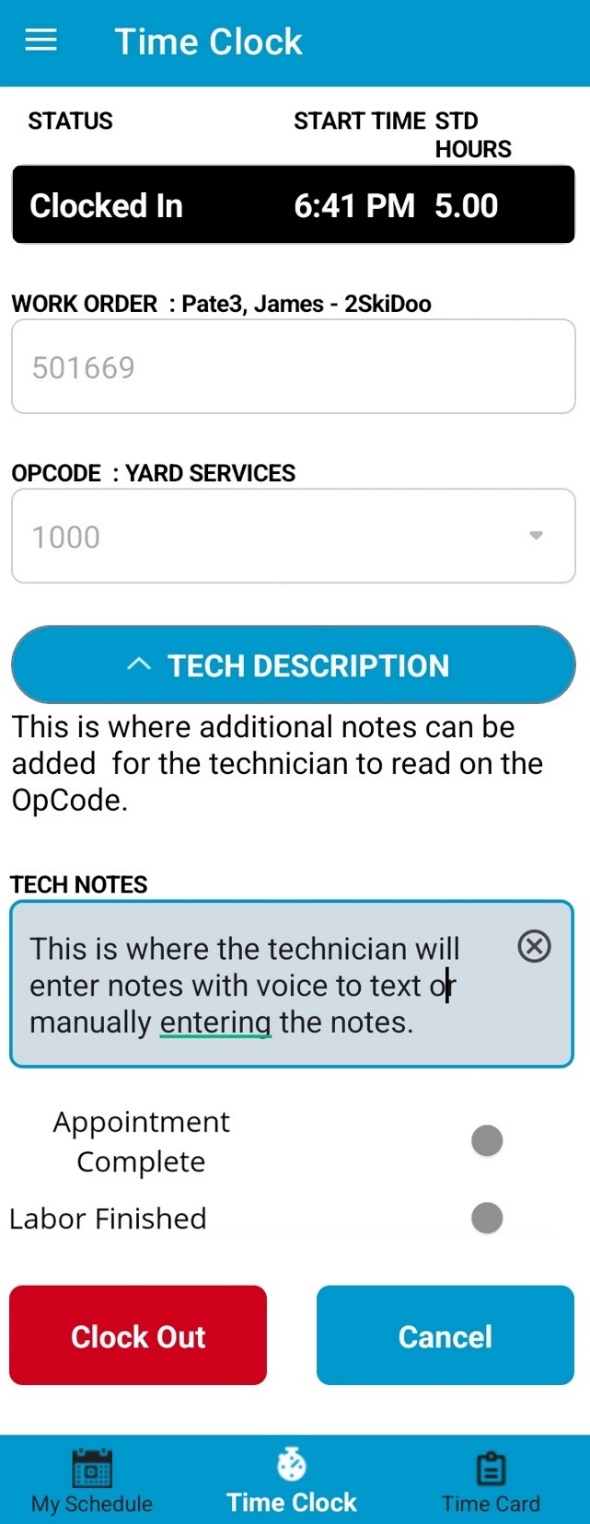
Once the Technician has either completed the work needed or needs to stop the Time Clock to return later, the Technician can select Time Clock to see the OpCode and select either Clock out or Labor Finished and Clock Out.
If you came from My Schedule, the work from there has an option to select Appointment Complete or Labor Finished prior to clocking out. While this is mostly a visual status change, clicking Appointment Complete will only change the status of the appointment selected. Appointment Complete will Not change Labor Finished. Labor Finished on the other hand will change the status on your time entry to Labor Finished as well as complete the Appointment. Labor Finished also changes the status of the op code from O to F in the work order in the DockMaster software.
Clicking Labor Finished will not prevent other time entries to be added to that op code.
TIME ENTRY
The difference between the Time Clock and Time Entry functions is that the Time Clock is like a stopwatch. The tech must clock in when he starts the job, then clock out when he is finished. The start and stop time is in real time.
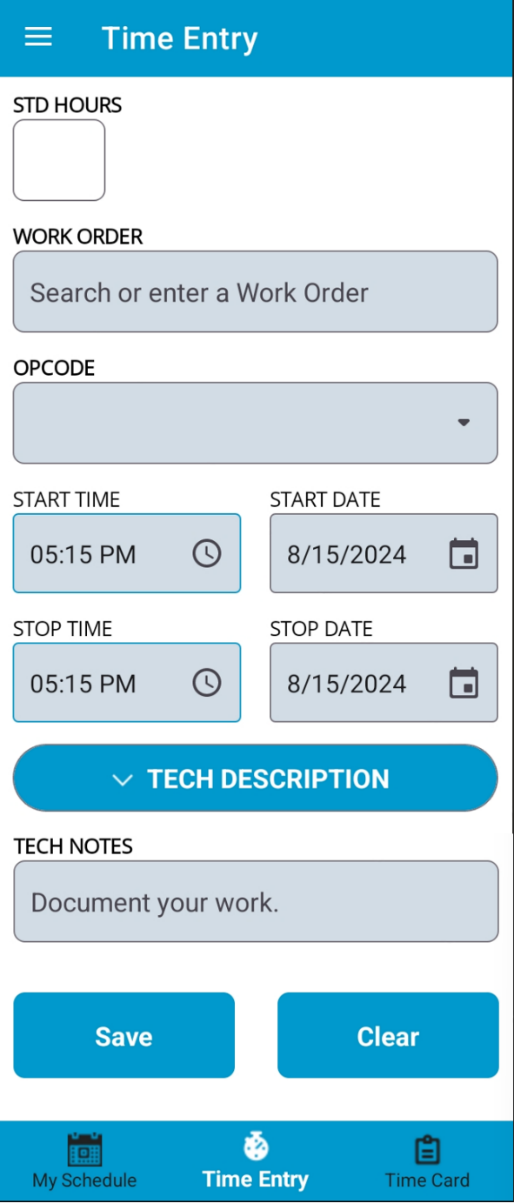
The Time Entry, however, can be filled in any time or on any day - the tech can enter any start time and any stop time to suit his needs.
Keep in mind that depending on how the Service Parameters are set up, the mobile app screen for Time Entry (not Time Clock) will be different.
This is the screen display if ENTER HOURS ONLY is not checked in Service Parameters. Any start and stop time can be entered; and the stop date can be changed.
TIMECARD
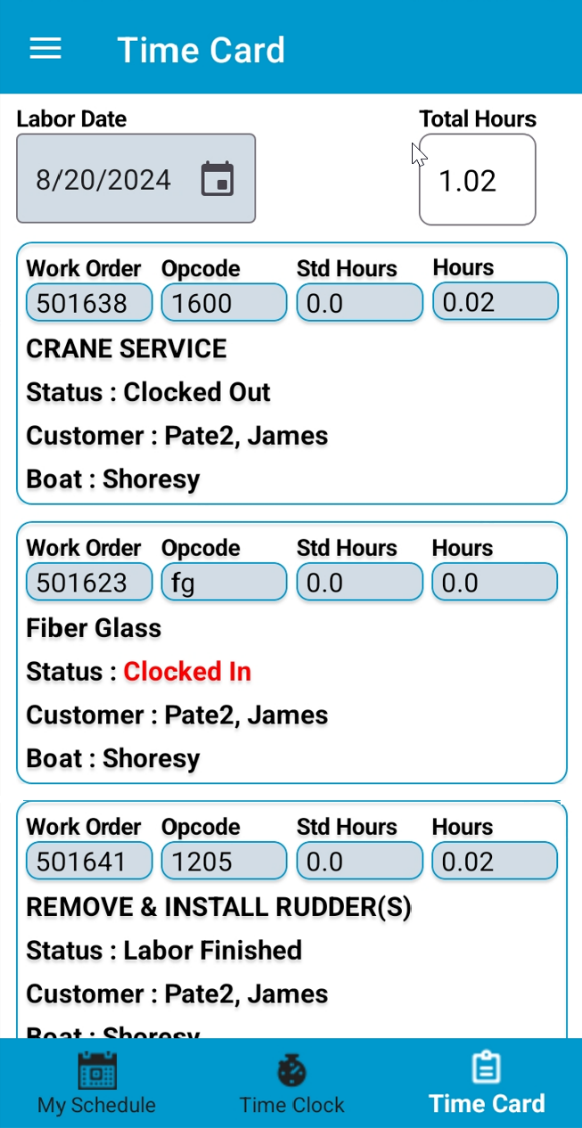
Once you have created time entries, either from the Time Clock or by Time Entry, switching to the Time Card displays all labor entries entered for the day, as well as total time worked for the day. Entries can be reviewed for any date. The Time Card inquiry screen will default to the current day and display any labor entries with that date.
While there may be other labor entries on this display, there will be only one entry, however, that is color-coded red to indicate a clocked-in status.
The status of all other labor entries on this screen will either be Labor Finished or Clocked Out. Once clocked into an op code, DockMaster Mobile can be closed. This will not stop the clock. When you log back in, the app will open to the Time Clock screen, displaying the work order and op code you had previously clocked in.
VIEWING TIME ENTRIES
The time functions of DockMaster Mobile allow the technician to view preview time entries.
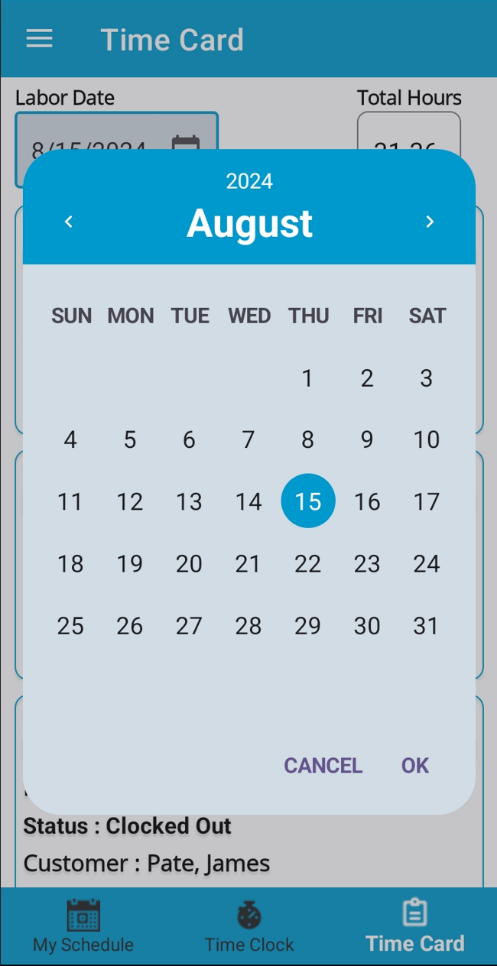
To search for labor entries on other dates, tap the date at the top left of the screen.
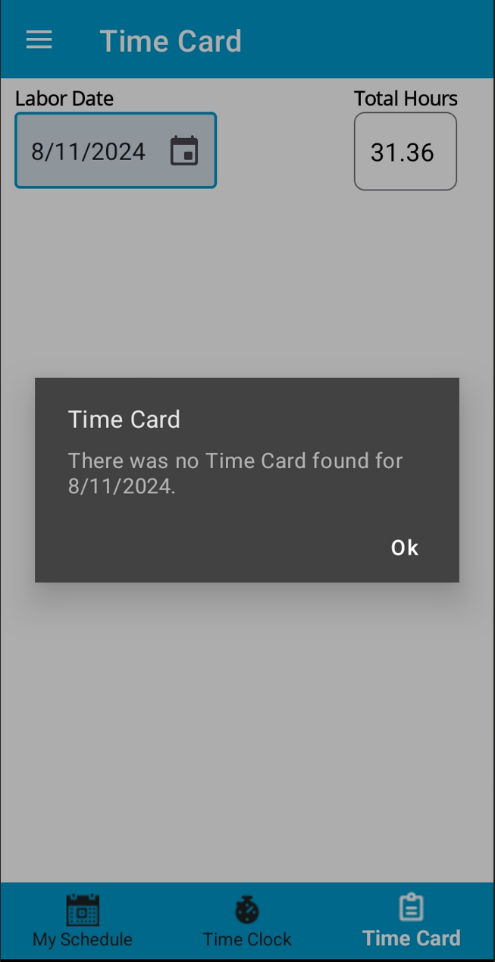
Upon tapping the date, a date picker is displayed. Click/Arrow a date to view the labor entries for the date selected and press OK. If there are no existing entries, a message will display.
VIEWING TIME ENTRIES, CONTINUED
Whether a time entry is created from Time Clock or Time Entry, users can view, edit or delete the entry. Time Entry mode allows a time entry to be edited, viewed or deleted. Time Clock mode only allows the entry to be viewed, or Notes edited.
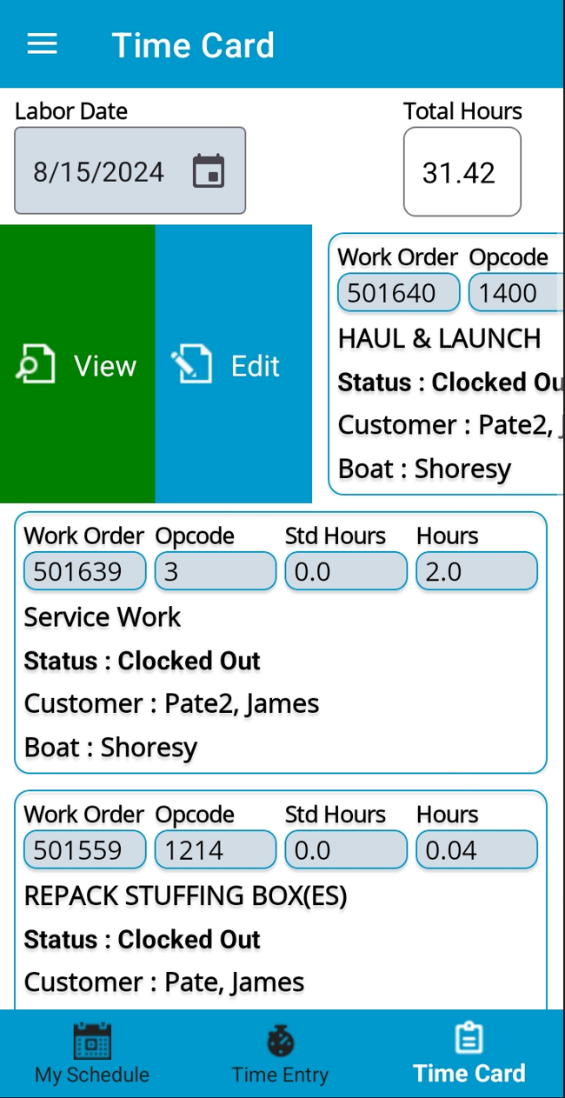
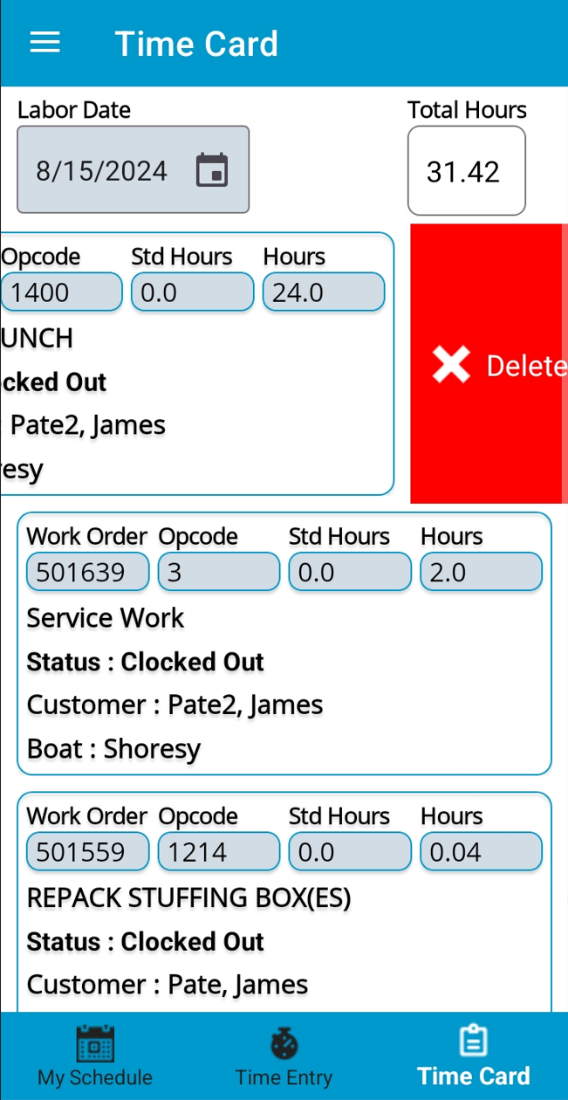
To Edit a time entry swipe right to get View or Edit, click Edit as needed. To Delete swipe left to get Delete, click Delete. You will be asked if you want to delete the entry to approve it.
Note: You can change an entry that originated in Time Clock by using this method, but you must be in the Time Entry mode.
