Automated Server Update
Automated Server Update
The automated server update is available for premise server based customers. It allows a System Administrator to upgrade their Operations database without the need of scheduling it with a support tech. The steps outlined below should be followed when a new version update message is displayed on the Home tab.
When a new release is made available for premise server based installs a new version update message will appear on the Home tab of all clerks who are Super users when the application is opened. The message will include links to Release Notes, System Requirements, Instructions and other information from time to time. The upgrade will need to be performed when all users have logged out of the application.
Upgrade Steps
When the update available message appears on the home tab, review the release notes and the current system requirements by clicking the links in the message. Note the message cannot be moved or removed from the Home tab. It will only go away once the server has been updated.

Determine when you will perform the upgrade. Note upgrades should not be performed on Fridays, before major holidays, or on the weekends when there is limited support available. Reminder, users cannot log in while the server update is running. When you are ready, log on to the server where DockMaster is installed and locate the Server Manager icon.

Open it and locate the Get Update button on the middle right of the form. Click it.

After clicking the Get Update button you may be prompted to accept the DockMaster Terms of Use (TOU). If prompted, you must accept the TOU before installation of the upgrade will continue. If you do not get a TOU prompt, then continue with step 6 below. The TOU will only appear when there are changes to Terms of Use.
- Save, will save a copy of the TOU to your server.
- Print, will print it with an option to select a printer.
- The Company field cannot be changed, however the name, and email address can be overridden as desired.
- When ready click the check box beside the agreement and then click the Accept button when it becomes active.

The Get Update form will now appear, please wait while the data accounts are checked. This may take several minutes and the status message will remain on the form until the process completes.

Once complete the main data account will be displayed at the top of the form. Click the Verify Account button at the top right. The main account will be confirmed; this may take a few seconds.

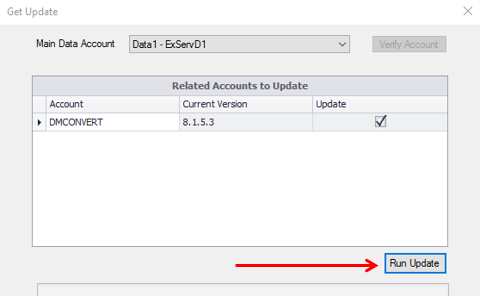
Once the main data account has been verified if there are any related accounts on the server that can be updated they will be listed and flagged by default to update. When you are ready to continue click the Run Update button. The update will be downloaded and the backup will begin running. Note depending on the number of accounts and the amount of data in them this may take from a few minutes to a couple hours to complete. The status bar will scroll continuously while the back up and upgrade is running.
You will see the backup running and then the server updates will automatically be applied. information will be displayed below the status bar while this is occuring.


When the Server update has been completed if there is an update available for the Communications server it will then be downloaded. Note the operating system may prompt you to confirm that it’s OK to perform the installation. The communications server must be installed in order to complete the upgrade.

Once the update is complete the Server Manager will close and reopen and then connect to the server. A message stating that the upgrade has completed will appear, click OK to close it and complete the server upgrade. Clerks can now login to DockMaster and begin updating the client installations.