Mail Merge
Creating Labels using Mail Merge
Step 1: Creating the Label Template
- To use the Mail Merge function in DockMaster to produce mailing labels you must first create the merge template in MS Word and define the merge fields using the DockMaster dictionary items.
- The template is created by using the Mailings Function in MS Word. Then choose the label function.
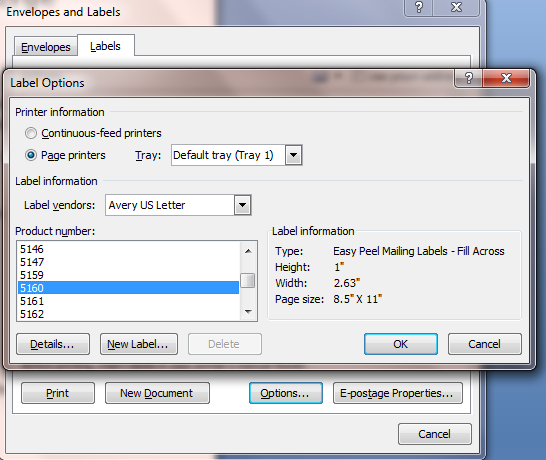
- Once the label window opens, click on the option button and you can choose the label manufacturer and the type of labels you are using.
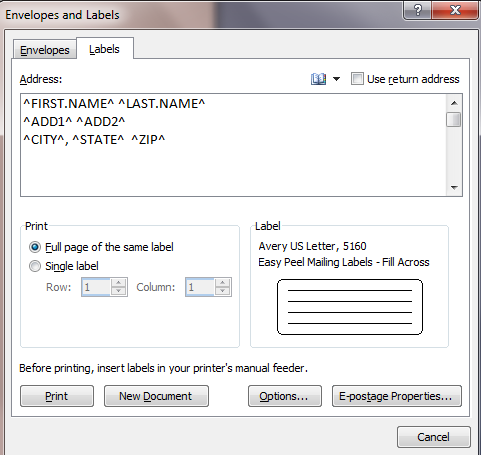
- Once you have selected the label stock click OK. A window will open and allow you to enter the DockMaster dictionary items that will be used in your mail merge. In this example we have chosen the option of "full page of the same label" using the dictionary items from the Customer File. Click the "New Document" button and save the document after it opens. You will be able to use this merge document over and over as long as you are using the same label stock.
Step 2: Creating the List
- Labels can be created for Customers or Vendors using the File Listings and specifying the criteria for the list.
- Go to DockMaster>File Listings>Customer File or Vendor File. (You can also use a custom report.)
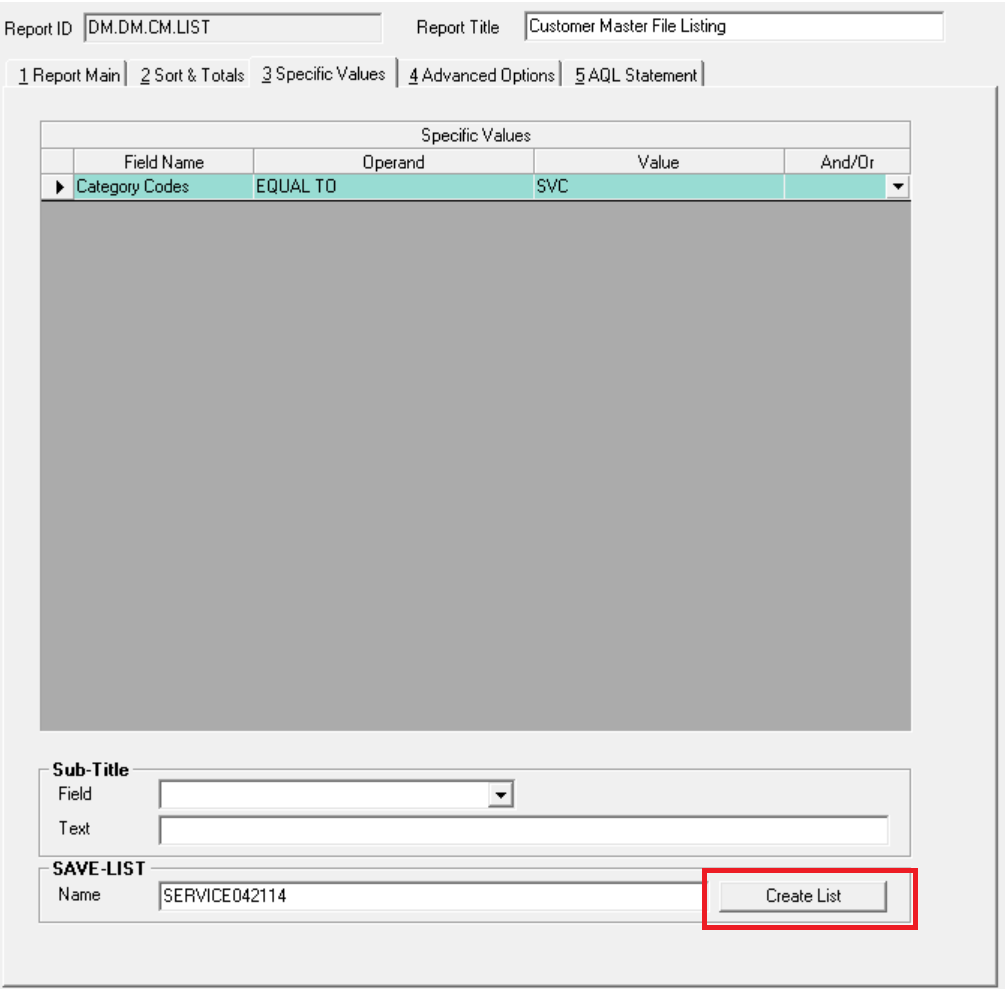
- You may print the entire list or select customers or vendor by adding specific values to the report. Customer Category codes are a good way to select a targeted group.
- For example, I want to create a list to make labels for my service customers. Service customers have been given a category code to indicate that they are a service customer and this will be added to the specific values in the Customer File Listing report.
- Once the criteria is specified, name the list and then click the "Create List Button".
- A SAVE-LIST is a static list of all the record IDs contained in your report. A list is a powerful tool that can be used in several areas of DockMaster.
Note: The Lists are static when they are created. If your data has changed and you need to update it, you will need to re-select the report and enter the same list name again.
Step 3: Using the List with Mail Merge and Printing
- Go to the Mail Merge function in DockMaster. (DockMaster>System Administration>Mail Merge)
- Enter your file name. (CM for the customer file and VM for the vendor file)
- Enter the List Name that was created in Report Generator or press F6 while on the list name field and choose the list. If you did not create a list and want labels for your entire customer file or vendor file simply leave the List Name field blank.
- Choose "Labels" from the drop down in the document type.
- Confirm that the labels per page default matches the label stock that you are using. If it does not then change the number of labels per page.
- Browse for your Word document.
- Click the print button in the blue control bar. Be patient, if could take a few minutes for the merge to complete.
- Once the merge has been completed the document will appear in MS Word. Labels can be edited here if necessary (you can edit the label information on the individual labels, delete one or change the font for example). Make sure you have the label stock in your printer and print from the MS Word document.
File Name: CM (Custom Master)
List Name: Save-List Name
Document Type: Drop down to select Labels
Labels Per Page: Drop down to select number per sheet you are using
(Example: Avery 5160, 30 standard mailing labels per page)
Word Document: Browse out to the label template* you have saved on your computer.
Click Print to Generator Word Document to Print - Once the merge has been completed the document will appear in Word. The labels can be printed as is or edited to remove labels or change the font.
*The Word label template much included the DockMaster Dictionary Items you wish to print. See example below.
| ^First.Name^ ^Last.Name^ ^ADD1^ ^City^, ^State^ ^Zip^ | ^First.Name^ ^Last.Name^ ^ADD1^ ^City^, ^State^ ^Zip^ | ^First.Name^ ^Last.Name^ ^ADD1^ ^City^, ^State^ ^Zip^ |
**If at any point you run into any issues, feel free to email [email protected] for assistance.**