Physical Inventory Tutorial
Physical Inventory Tutorial
INTRODUCTION:
Year-end procedures enable you to move current year sales and purchases data
to prior year and reset the year-to-date sold, purchased, and received totals.
This process is designed to be run once, at the end of your fiscal year.
The inventory manager should have a detailed plan for taking a physical count
prior to beginning the following steps:
1. Print count sheets and Create Inventory Lists via Report Generator
2. Reset year-end totals
3. Halt sales if possible (otherwise need to track sales prior to items counted)
4. Halt purchasing and receipts
5. Physically count inventory quantities
6. Begin sales if halted (once each shelf is counted)
7. Enter Physical Inventory Count
8. Print Physical Inventory Extension report
9. Print Physical Inventory Variances report
10. Move physical counts to quantity on hand
a. Use Accumulated Sales and Purchases if you continued to Buy and
Sell merchandise during the course of doing inventory
11. Print Perpetual Inventory Extension Report
12. Begin purchasing and receiving
13. Adjust General Ledger inventory accounting
**Important Note** These inventory procedures do not affect the Fuel
Inventory (FL) file. Use Fuel Inventory Adjustments to update quantities for
fuel items.
PRINT COUNT SHEETS:
Standard DockMaster Count Sheets include the part number, stockroom location,
description, unit of measure, and a blank column to enter the quantity counted, in
that order.
Standard Count Sheets can be printed in the Physical Inventory Menu Print
Count Sheets.
Custom Count Sheets can be printed and Lists can be created using the report
generator.
![]()
The file name used to print sheets and create lists is the IM file.

The Custom Count Sheet can be arranged for optimum counting and inputting:
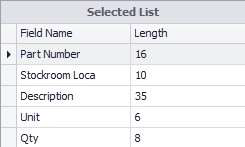
The Dictionary Item Qty prints a ______line
Before printing and creating your lists, you must decide the order in which you
want the items sorted and the specific criteria you will use to create the lists.
A few of the sort options you may choose include:
• Stockroom Location o Followed by Part Number
• Department
• Class Code
• Vendor
• Part Number

Determining the specific criteria used in the selection process will depend greatly
on how you enter your inventory and the physical layout of your inventory.
A few of the selection options you may choose include:
• Stockroom Location o Most common
• Department
• Class Code
• Vendor
This criteria would Print the Entire stockroom of parts that have a Stock Room
Location:

This criteria is specific to an area of the stockroom

[ ] are wildcards used to delineate specific values
0101] will print anything beginning with 0101 no matter the ending [0101]
will print anything with the value 0101 in it
[0101 will print anything ending with 0101 no matter the beginning
Hint: Use the Sub-Title to better define the count sheet (match to the
Create-List statement) See Create Inventory Lists

There are some Advanced Options you should consider:

Double Space count sheets to make reading and writing easier…
Using the Enter Specific Values option will open the report to the specific value
screen each time the report is called up.

By using the Break On you can separate each Stock Room location.
By using the Break On with the Page Break each stockroom location will be on a
separate page.
CREATE INVENTORY LISTS
Lists of inventory items are created and sorted to facilitate the physical count
process. These lists can be used to produce multiple inventory reports. In this
process they will match your count sheets for physical count entry.
**Important Note** It is a common misconception that inventory lists
created on a certain date can be used later to report on inventory as it
stood on that date. This is incorrect. These lists only contain part numbers;
the entire inventory record is not set aside. When reporting with lists, you
are pulling the current inventory information.
Once you have entered your sort and specific options, you need to be sure to
save your list. At the bottom of the Specific Values Tab, enter your list name in
the SAVE-LIST name field, and click Create List.
HINT: Name your list according to your specific criteria. For example, if
you are creating your lists by Location use the Location Criteria name as
your list name. This will make recalling your lists much easier.
Multi-location sites need to create lists specific to each location. Special
attributes for up to five locations have been created to pull a specific location’s
data.
Departments Dept Loc1, Dept Loc 2, Dept Loc 3
Stockroom Locations Stock Rm Loc1, Stock Rm Loc 2, Stock Rm Loc3
Quantity on Hand QOH Loc1, QOH Loc 2, QOH Loc 3, etc.
RESET YEAR-END TOTALS:
Reset the year-end totals at the end of your fiscal year or before you begin taking
a physical count. This resets year-to-date totals for all locations. This process
will also reset your last physical quantity to 0.
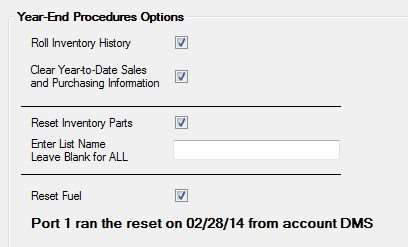
THIS SHOULD ONLY BE DONE ONCE A YEAR! You will receive a warning
when opening the "Reset Year-end Totals" form…
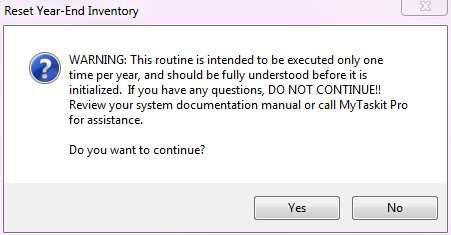
- Roll Inventory History – If checked, this process moves the current year-todate
sold, purchased, and received information to the prior year fields in the
INVENTORY MASTER (IM) and in the INVENTORY HISTORY (IH) files.
Note: The Inventory History file is used for the Monthly Sales Analysis
report.
-
Clear Year-To-Date Sales and Purchasing Information – This process
zeros the counter for year-to-date sales and purchases. The new year-to-date
sales that are tracked while the count takes place are used when the physical
quantity is moved to quantity on hand. If you do not ‘check’ this box, you must
answer ‘N’ to Use Accumulated Sales and Purchases during the Move Physical
to Quantity on Hand process. See MOVE PHYSICAL to QUANTITY on HAND. -
Reset Inventory Parts – If checked, parts will be Reset based on the list
name entered in the following step. If no list name is entered, ALL parts will be
reset. -
Enter List Name or All – You can run this process for you entire inventory
all at once or choose to reset by list. Be sure that if you are doing your reset by
list that you have ALL of your inventory included in your lists.
**Important Note** The Reset Year-End Totals routine may be run
without entering physical inventory counts. However, the process Move Physical to Quantity on Hand can not be run without first resetting yearend
totals.
- Reset Fuel – If checked, all fuel Year to Date sales and cost of sales
information will roll to last years sales and then 0 out this years fuel sales. The
fuel history file (FH) will roll this year’s monthly fuel info into last years monthly
info, and then 0 out this year. If left unchecked, then the FL and FH files are not
reset.
TAKING A PHYSICAL COUNT:
Stop all Sales and Purchasing.
**Important Note** If you are unable to stop sales and purchasing during
the Move Physical to Quantity on Hand process, then you must track
items sold and received after the year-end reset but before the shelf has
been counted. The physical count must be adjusted to include these
quantities before entry in DockMaster. If you do not, your quantity on
hand will be incorrect. In the following example we are assuming that
you have answered ‘yes’ to Clear Year-to-Date Sales and Purchases
during the Reset Year End process and that you will be answering
‘yes’ to Use Accumulated Sales and Purchases during the Move
Physical to Quantity on Hand process.
Example: Let’s assume that at the time you do your reset, part ABC has
12 items on the shelf. After your reset was run but before you counted the
item ABC, 3 items were removed from the shelf and sold. When you count
the item and enter your count on your list, you will show 9 items on the
shelf. Once you have entered the actual physical counts on your count
sheets, you must go back and adjust those counts by the number of items
sold. Therefore, you would replace the 9 with 12 for part ABC. These
adjusted quantities are then entered as your physical inventory counts.
The section MOVE PHYSICAL TO QUANTITY ON HAND explains how
DockMaster uses the new year-to-date figures to calculate the quantity on
hand.
ENTER PHYSICAL INVENTORY:
The entry of the physical counts use the same lists created in the first step.
Specific part numbers can also be entered. Physical count entry is done by
location for multi location sites.
R - If you select the Replace option, the current physical count being entered for
each item overwrites any previous entries.
A – If you select the Add option, the current physical count entered for each item
will be added to any previous entries.
**Important Note** Once you enter into a list and begin entering
quantities you CANNOT exit that list and then reenter at the same point.
You are left at the part number prompt at the end of the parts list. You can enter
the physical count for additional parts here. These parts are not automatically
added to the list and will not be included in the physical move when using this list
unless you add these parts to the list from TCL.
ED DM.LISTS list name:
• You should see the word “TOP’ and be at a “.” prompt.
• Enter “I” to insert part numbers.
• You will see ‘000+’ enter each part number and press Enter
• Press Enter at “000+” when you are done and you will be at a “.”
prompt again. • Enter “FI” at the “.” prompt to file the list.
• Enter “EX” at the “.” prompt to abandon editing the list if you make a
mistake.
PRINT INVENTORY REPORTS
Print the Physical Inventory Extension report to review the physical counts
entered and their total cost. This report includes the physical count and the
extended dollar amount (physical quantity * weighted average cost).
Print the Physical Inventory Variance report to review the differences in the
current quantity on hand and the physical count entered. The figures in this
report can be used to enter the inventory adjustment amount in the general
ledger. This report includes the physical count and value, and the variance
quantity and value.
Hint: Change the Sort Order of this report so that your noticeable
variances are at the top and bottom of the report.
Print the Perpetual Inventory Extension report to review the current quantity on
hand for each part and their extended cost. This report includes the average
cost, quantity on hand, and the extended dollar amount.
ALL reports can be adjusted to be printed by specific location:
Quantity on Hand QOH Loc 1, QOH Loc 2, QOH Loc 3
Perpetual Extension Perpetual Loc 1, Perpetual Loc 2, Perpetual Loc 3
Physical Extension Phys Ext Loc 1, Phys Ext Loc 2, Phys Ext Loc 3
Physical Quantity Phys Qty Loc 1, Phys Qty Loc 2, Phys Qty Loc 3
Variance Quantity Variance Qty 1, Variance Qty 2, Variance Qty 3
Variance Value Variance Val 1, Variance Val 2, Variance Val 3
End Quantity End Qty Loc 1, End Qty Loc 2, End Qty Loc 3
End WAV Value End WAV Val 1, End WAV Val 2, End WAV Val 3
MOVE PHYSICAL TO QUANTITY ON HAND:
Physical count quantities are moved to quantity on hand typically when you are
satisfied with your variance. The methods for moving Physical Inventory are ALL
or by using the same lists created in the first step. Physical counts are moved by
location for companies with multi locations.
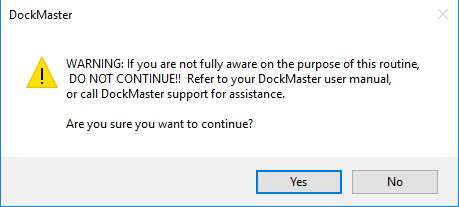
YOU WILL RECEIVE A WARNING! Click yes if you want to continue.
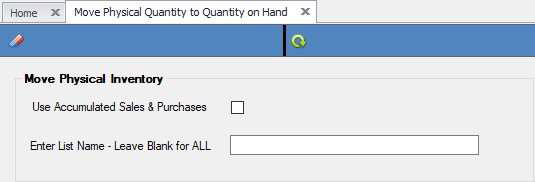
- Use Accumulated Sales and Purchases – If checked, this process takes the
physical quantity entered; subtracts the year-to-date sales quantity, adds the
year-to-date purchases and overwrites the quantity on hand with the total.
**Important Note** The quantity on hand calculated will be incorrect if the yearto-
date sales and purchases were not reset prior to moving physical to quantity
on hand.
This step should not be done without first resetting year-end totals. It is important
to understand how the reset assists in tracking sales occurring during the
physical counting process.
GENERAL LEDGER INVENTORY ADJUSTMENT:
You may want to adjust the general ledger inventory account to match the actual
inventory balance. The adjustment amount can be found by analyzing one of the
following reports:
The Physical Inventory Variances report printed prior to moving physical
to quantity on hand.
The Perpetual Inventory Extension report printed after moving physical
to quantity on hand.
All reports, including the count sheets, should be retained for audit purposes.
**If at any point you run into any issues, feel free to email [email protected] for assistance.**