Point Of Sale Button Setup
Button Settings
The Button Settings tab contains the button settings for the register being defined. that each register be defined with buttons that are applicable to the items that are sold in the area that the register resides in.


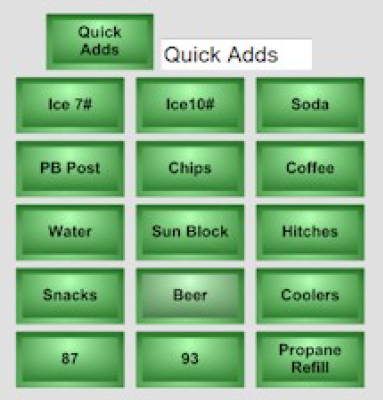
Button Settings - There are three sub description fields located under the Button Settings tab. These are the descriptions that appear buttons on the Main POS Sales Menu.
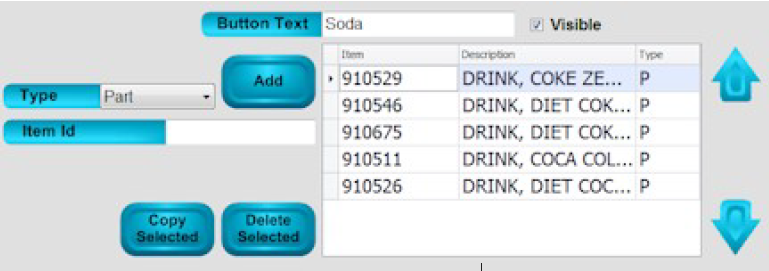
Button Text - This field contains the button description for the selected button.
Visible - This checkbox when checked allows the button to be visible as a selection on the ticket.
Type - This field contains a drop down list of allowed item types, one or more item types can be defined per button see below;
- Part -Defines the item being added is a valid part number in the Inventory Control module
- Kit - Defines the item being added is a valid parts kit in the Inventory Control module.
- Bill Code - Defines the item being added is a valid bill code in File Maintenance.
- NonInv - Defines the item being added is a valid non- inventory item as defined in the Inventory Control Parameters menu. (Note this item replaces cost line and cost code functionality used in Point of Sale 6.2.x)
Item Id - This field is used to add the item id number for the selected type above when configuring the button.
Export - This button when Tapped exports the current button configuration to the for importing by another register. It is useful when multiple registers need to be configured with like or similar button configurations. Note multiple configurations can be created for clerks, seasons, events, etc.
Import - This button when Tapped imports a button configuration from the configuration file that was created by another register. It is useful when multiple registers need to be configured with like or similar button configurations. Note multiple configurations can be imported for clerks, seasons, events, etc. by replacing the current defined configuration.
_____________________________________________________________________________________________________________________________________
Defining a Button
- From the Main screen in POS tap the Functions button.
- Tap the Register tab that appears on the right of the Functions screen.
- Tap the Register Setup button.
- The system Register Setup menu will appear, and the Button Settings tab will be open.
- For each sub description field enter a name for that group of quick add buttons. Note in the image above the sub description field is named "Quick Adds"
- Select a button to define by tapping on it. Note that the focus does not change on the button, but the button text and item grid will change to represent that button's current settings.
- In the Button Text field enter a name for the button.
- In the Type field select the type of item that is being added.
- In the Item Id field enter the id of the item that is being added.
- Tap the Add button to complete the line entry.
- Repeat step 8 as needed if additional lines are being added for the selected button.
- Tap the Save button before editing the next button or closing the menu.
**If at any point you run into any issues, feel free to email [email protected] for assistance.**