Paying AP Invoices by Credit Card
Purpose: This document will teach the DockMaster user how to setup a credit card vendor as a financial institution, as well as how to pay accounts payable invoice/credits with a credit card. The user will also learn how to process credit card charges for one-time purchases through the manual check routine.
Many times a credit card is used to purchase supplies, goods, and services from vendors. To track the information by the vendor that provided the items purchased, the items need to be entered into DockMaster as fuel, supplies, inventory purchases, sublet purchase orders, or other expenses.
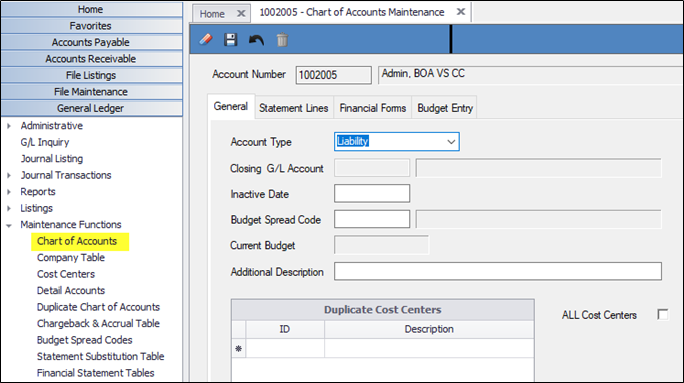
Step 1: Create a GL Liability account for the credit card
For each credit card that will be used for purchases within DockMaster, a general ledger liability account will need to be created. This will allow proper reconciliation for each credit card vendor.
- Review the Chart of Accounts listing to determine where the account number should be inserted.
- Go to General Ledger > Maintenance Functions > Chart of Accounts and create an account number in the administration cost center only. Select Account Type Liability.
Step 2: Create a vendor for the credit card
The credit card company needs to be set up as a vendor to enter the amount to be paid against the credit card statement each month. To create the vendor file go to File Maintenance > Vendors.
Step 3: Create a financial institution for the credit card
Like an operating account, a financial institution will need to be created for the credit card.
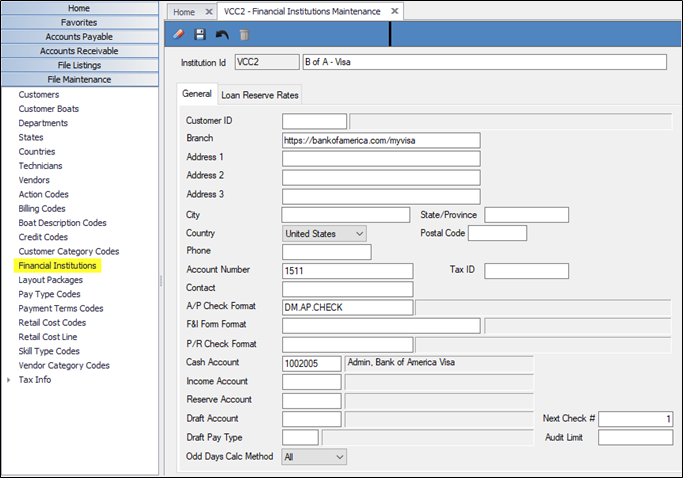
Go to File Maintenance > Financial Institutions and create a financial institution for the credit card company. Enter the following fields:
Institution ID – Type in a new ID into the Institution ID field then enter the credit card description.
Branch - Use the Branch or address fields to store website URL to review the credit card account.
Account Number – Not required but can be utilized.
A/P Check Format - The A/P check format will auto-populate, but can be changed, if required.
Cash Account - Enter the liability account that was created in step 1.
Next Check Number – Not required but can be utilized.
Step 4: RECORDING TRANSACTIONS IN DOCKMASTER FOR THE CREDIT CARD
To make payment with a credit card for AP invoices that have already been entered into DockMaster
- From Accounts Payable > Check Processing > Invoice Payment Selection, select the invoices that you wish to pay (or have already paid) with a credit card. Do not select invoices that will be paid by check or another credit card.
- Go to Accounts Payable > Check Processing > Pending Disbursements Report and verify that the selected items are accurate.
- Go to Accounts Payable > Check Processing > Check Printing
Bank Code - This is the same Financial Institution ID that was set up for the credit card in Step 3.
Starting Check Number – leave blank if using system generated check numbers or type an appropriate ID or enter the confirmation number provided by the vendor when payment was made.
Check Date – Enter the payment date.
Vendor ID – Enter vendor id(s) or leave blank for all.
- Click the Printer icon. Print the check onto plain paper or preview to the screen.
Recording credit card charges into DockMaster using manual check method
This process is used to record those credit card purchases and charges that have not been entered into DockMaster. It does not allow an inventory receiver to be attached to the invoice.
Charges of this type can either be assigned to a vendor already set up in Vendors or vendor 99999. Alternatively, a non-specific vendor for each type of purchase (i.e. fuel, snacks) could be created with the GL expense account numbers already defined.
- Go to Accounts Payable > Check Processing > Manual Check Entry.
Bank Code – Enter the Financial Institution ID that was set up for the credit card.
Check Number - Enter text for the Check Number.
Vendor - If the vendor is already set up in DockMaster, select the appropriate vendor ID, otherwise, type 99999 into the Vendor ID field for miscellaneous entries and enter a Vendor name if desired.
Check Date - Type the actual date of the charge.
Check Amount - Enter the amount of the charge
Comments – Not required
Invoice Listing grid
Invoice number - Answer yes to the message to create the invoice.
Balance - Enter the amount of the invoice.
Expense Distribution grid –
GL Account - Enter or F6 the appropriate GL account number.
- Click the Post icon to record the transaction to the vendor and the charge to the credit card financial institution.
Step 5: Making a payment towards the credit card balance
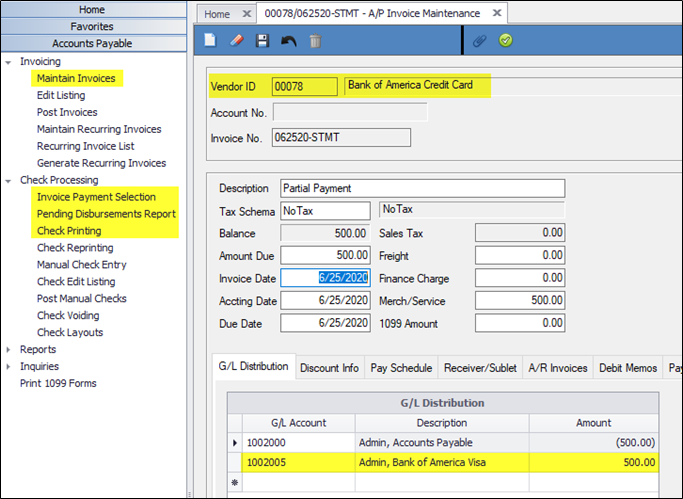
Making a payment towards the credit card balance or paying the credit card balance off can be recorded in DockMaster and accomplished using one or a combination of two methods – printing a paper check or making an electronic payment. The first step is to create an invoice for the payment amount being made.
- Go to Accounts Payable > Invoicing > Maintain Invoices.
Vendor ID – Enter the Vendor ID created in step 2
Invoice No. – Enter a descriptive text
Description – Not required
Amount Due - Enter the amount of the payment.
Invoice Date – Enter the date of the payment, not the date the payment is due.
- Ensure that the GL account being debited is the credit card liability account created in Step 1.
- Click post.
The second step is to select the invoice just created for invoice payment selection.
- From Accounts Payable > Check Processing > Invoice Payment Selection, select the invoice that you wish to pay (or have already paid). Do not select invoices that will be paid by check or another credit card.
- Go to Accounts Payable > Check Processing > Pending Disbursements Report and verify that the selected item is accurate.
- Go to Accounts Payable > Check Processing > Check Printing.
- Decide which of the following 2 types of payments will be used:
To print paper check to be mailed:
Bank Code - Type or F6 to select the bank ID used to print paper checks.
Starting Check Number –System will auto-generate the next check number.
Check Date – Enter the payment date.
Vendor ID – Enter vendor id(s) or leave blank for all.
OR
To record an electronic payment:
Bank Code - Enter the Institution ID of the Financial Institution created to record electronic payments that is tied to the Cash account linked to your main operating account. (This is not the Financial Institution created in Step 3).
Starting Check Number – System will auto-generate the next check number.
Check Date – Enter the payment date.
Vendor ID – Enter vendor id(s) or leave blank for all.
- Click the Printer icon to print the check onto an accounts payable numbered check, plain paper, or preview to the screen.
NOTE – When the credit card balance is paid off completely, and no other charges have been entered, the balance of the liability account will be $0.00 until the next transaction is posted.
Step 6: Processing Returns or Credits
When a product purchased by credit card is returned for credit, a credit memo will need to be entered into accounts payable.
- Go to Accounts Payable > Invoicing > Maintain Invoices.
Vendor ID – Enter the Vendor ID, not the credit card vendor.
Invoice No. – Enter credit memo number.
Description – Not required.
Amount Due – Enter the amount of the credit, which will be negative.
Invoice Date – Enter the date of the credit
- Ensure that the GL account being credited is the correct account that was used for the original purchase, then click the green icon to post.
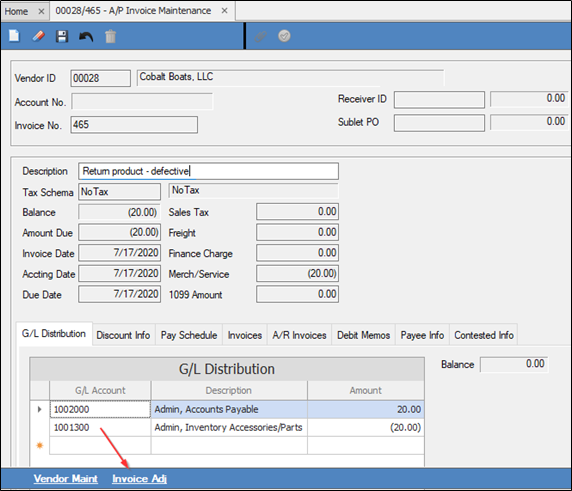
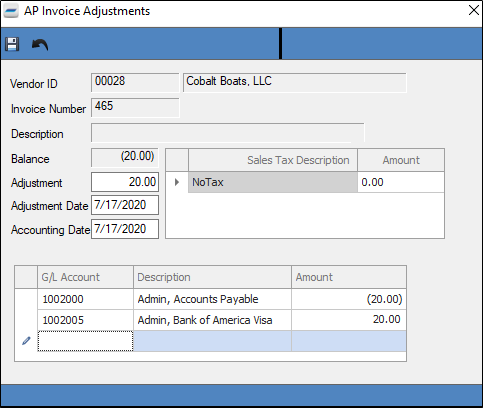
- Adjust the credit memo off – Because the system does not allow a negative check to be printed, the credit memo will need to be adjusted off so that it appears as a reconciling item in the general ledger account for the credit card. Recall the credit memo that was just posted then click on “Invoice Adj”, located at the bottom of the screen.
- Complete the screen as below:
Adjustment – Enter the amount as a positive number.
G/L Account Grid –
2nd line of the grid:
G/L Account – Enter the credit card payable account.
Amount – Type in the adjustment as a positive number.
Click the Save icon.
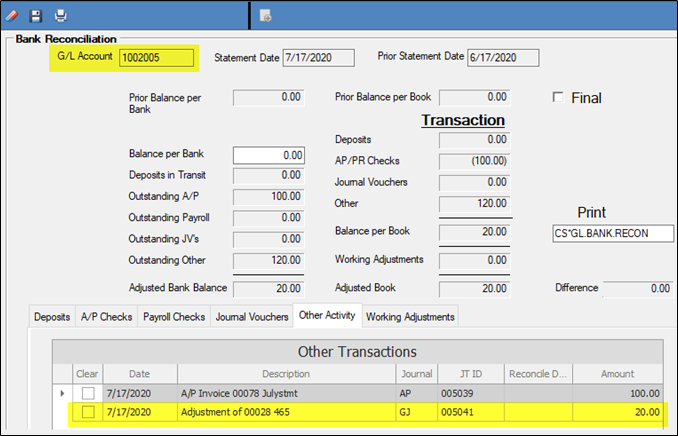
Once these accounts payable transactions are posted to the general ledger, they will show in the bank reconciliation screens to be reconciled.
Step 7: Reconciling the Credit Card statement
Using the general ledger account number created in Step 1, the Bank Reconciliation program in General Ledger > Administrative will be used to reconcile the Credit Card statement. Fees, adjustments, and interest charges should be entered as journal transactions with effective dates prior to the date of the credit card statement.
When using the bank reconciliation program to reconcile a credit card account, the “Balance per Bank” needs to be entered as a NEGATIVE number.
Enter the statement date as the actual statement date, not the due date.
**If at any point you run into any issues, feel free to email [email protected] for assistance.**
