Processing Electronic Payments To Vendors
Purpose: To instruct the DockMaster user how to setup an additional financial institution to be used to record payments made electronically or via ACH drawn directly out of the bank account, as well as the steps to process accounts payable invoices and one-off purchases through the manual check routine.
Step 1: Create a Financial Institution (one time only)
Although a financial institution is already defined and associated with a bank account, a new financial institution should initially be created to be available for selection for electronically paid invoices.
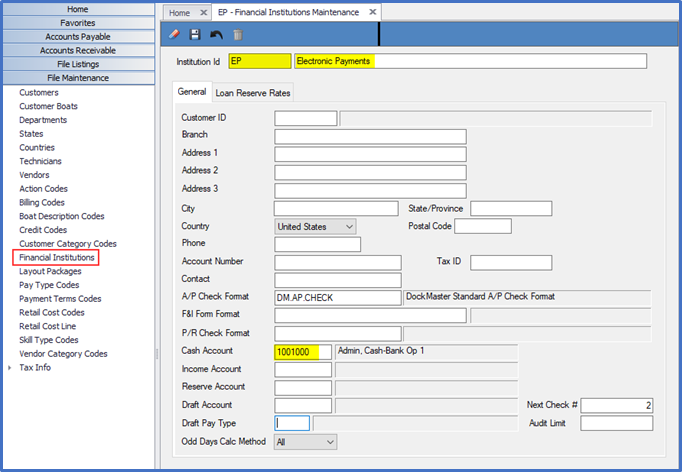
From the Menu, click File Maintenance > Financial Institutions
Institution ID - Enter a user-defined ID in the Institution ID field. The Institution ID will be referred to in the Accounts Payable module as the Bank Code.
Name - Enter a description for this form of payment.
Cash Account - Pressing F6 to choose the properly associated bank account from the Chart of Accounts.
Other fields may be filled in, but they are not required.
Step 2: Entering Payables
A/P invoices and vendor credits paid electronically will be entered using the same process as your payables that will be paid by check.
Enter the invoices and credit memos as normal into A/P Invoice Maintenance using the vendor’s id number and the default Accounts Payable GL number.
Step 3: Recording Payment by Invoice Payment Selection
For payables that will be selected using Check Processing -> Invoice Payment Selection, follow the process listed below. (For one off payments, proceed to step 4 below for manual check entry and processing).
When you are ready to record the payment to the vendor, select the appropriate invoices to pay as normal, however, only select the invoices you will be paying or have paid via electronic payment or ACH. Do not select vendors that will be paid by check.
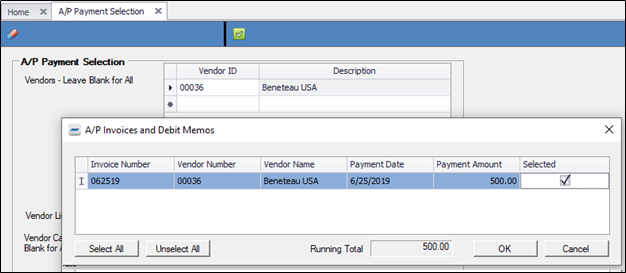
Run the A/P Pending Disbursements Report to verify that the appropriate invoices and credit memos have been selected.
Contact the vendor or logon via the web to your account and make the actual payment.
Print the payment page or make a note of the transaction id. Repeat for each vendor you are paying.
Go to Accounts Payable -> Check Processing -> Check Printing and enter the Bank Code created specifically for electronic payments or press F6 for a listing of IDs.
The Starting Check Number may be started at 1 then incremented automatically thereafter.
Change the Check Date if needed. Enter the Vendor ID for the invoice(s) that has been paid electronically.
If you are using unique check numbers per vendor, you will need to process your checks one at a time by vendor. If you are using a default check numbers (i.e.: 101, 102), you can process all selected payments at one time.
Click the printer icon to print the “check” which also simultaneously creates the general ledger journal transaction for the payment. Repeat this process for each vendor that is being paid if you are using unique check numbers.
NOTE: The code for the Financial Institution, as shown below in the G/L Inquiry screenshot for the Cash Account 100100, that the Document number begins with the electronic payment code of EP sets the transaction apart from the other payments.

Step 4: Recording Payment to Miscellaneous Vendors for Purchases
For miscellaneous vendor entries (gas receipts, supplies, travel, one-off inventory purchases, etc.), use the manual check entry routine to process those purchases/payments.
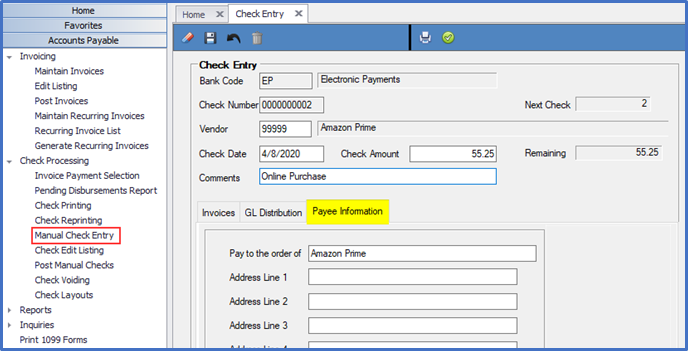
Bank Code - Enter the appropriate Bank Code for the electronic payment.
Check Number – Enter the Next Check number
Vendor - Enter 99999 (vendor for miscellaneous entries) or select the appropriate vendor number if defined in the system. If 99999 is entered, the Payee Information will display.
Pay to the order of - Enter the Vendor Name, and if desired, the address information.
Check Date - Enter the date the transaction took place.
Check Amount - Enter the amount paid.
Comments - Enter a description, if desired.
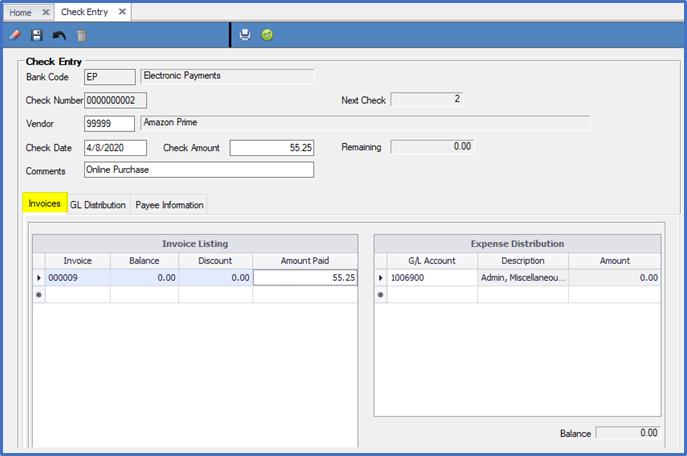
Click on the Invoices tab.
Invoice - Enter the invoice number if already posted in AP *OR* type “N” for the next available invoice number for this vendor *OR* enter the actual invoice number you are paying. If this is a new invoice that has not been posted, you will be prompted to create the invoice here.
Tab across to the amount paid.
Amount Paid - Enter the amount to be deducted from the bank account.
G/L Account - If you are entering a new invoice on this screen, you may need to click in the GL Expense Distribution grid and select the appropriate GL account number the invoice should be posted to.
Step 5: Reconciling the Electronic Payment
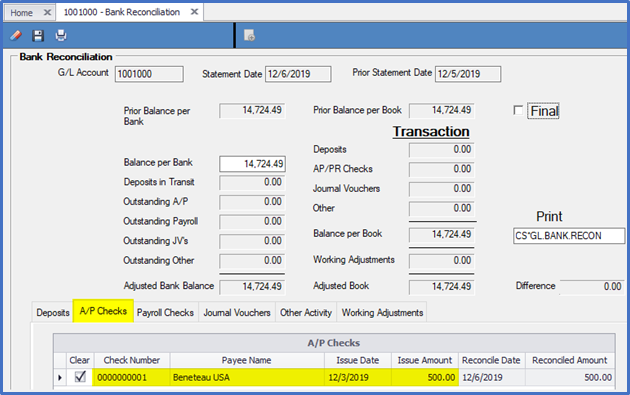
When reconciling the bank statement, those transactions paid with the Financial ID code created specifically for electronic payments will be located within the grid on the A/P Checks tab. Notice the Check Number uses a different number series than the regular accounts payable checks.
**If at any point you run into any issues, feel free to email [email protected] for assistance.**