Refunding a Customer's AR Credit Balance through AP
Refunding a Customer's AR Credit Balance through AP
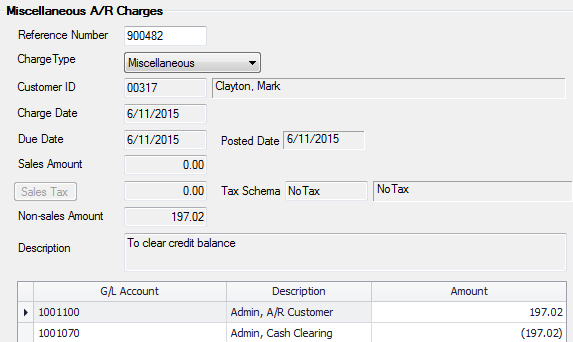
- Create a Miscellaneous AR invoice to credit the balance on the customer's AR account.
- From the main menu go to Accounts Receivable > Charges > Miscellaneous Charges.
- Enter the amount of the refund in the Non-Sales Amount field. (Using this field will not add sales tax to the invoice.)
- Use a General Ledger clearing account for the offset in the General Ledger Distribution.
- Post the invoice.
Example

Customer Ledger card after the Misc Charge Transaction was posted shows zero balance

- You will need to apply the credit balance to the invoice you just created.
- To do this, from the main menu go to Accounts Receivable > Credit Memos & Adjustments > Apply Credit Memos.
- Enter the Credit Memo number (you can see this on your ledger card).
- Enter through the date field for today's date or enter a date of your choosing.
- Enter the invoice number (also seen on the ledger card) or press F6 for a list to choose from.
- Click the Save icon to apply the credit memo.
- Create the AP Check
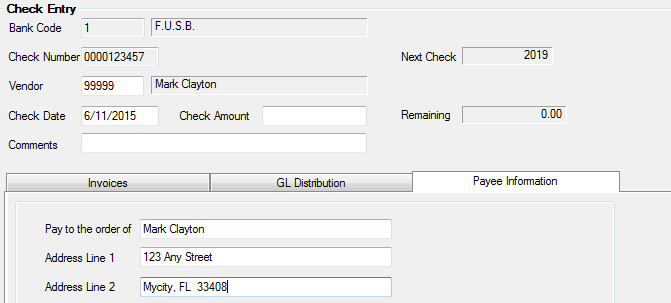
- From the main menu go to Accounts Payable > Check Processing > Manual Check Entry.
- Enter Bank Code and Check Number.
- Enter the miscellaneous vendor number in the Vendor field. (The Misc Vendor is 99999).
- The Payee Information Tab opens. Enter the Customer's name and address as you want it to appear on the check. After you enter the customer info the customer's name will appear next to the misc. vendor number.

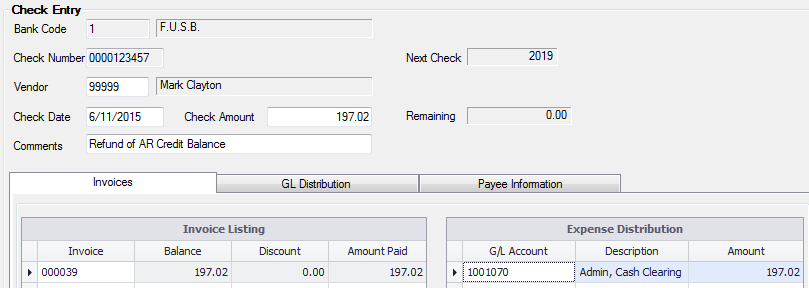
- Go back to Tab 1 Invoices. Enter the amount in the Check Amount field.
Enter comments if desired. - Type an "N" in the invoice number field. The system will automatically assign an invoice number. You will receive the message below and should answer "Yes".
- Enter the amount in the Balance field next to the Invoice number and press enter.
- Change the GL number in the Expense Distribution field to match the clearing account that you used in the AR Misc Invoice. Note: your cursor must be on the invoice line.

- Click on Tab 2 GL Distribution if you would like to see both the debit and the credit of the entry
- Click the Print/Post icon to print your check now. You also have the option to click the Post icon and print the check later by utilizing the Invoice Payment Selection process.
**If at any point you run into any issues, feel free to email [email protected] for assistance.**