1099 Setup and Process
Purpose: This document will teach the DockMaster user how to setup the Vendor file and the Accounts Payable module to track 1099 payments to vendors and report on those amounts.
The calculation of 1099 amounts for selected vendors is set up in Vendor File Maintenance and maintained through Vendor File maintenance and Accounts Payable. For each vendor to be set up as a 1099 vendor, the vendor file must be configured that this is a 1099 vendor and the year for which to begin the recording of AP payments, the type of 1099 form that this vendor receives, and a beginning balance and year if you are not starting at the beginning of the year.
As accounts payable checks are written for this vendor, the amount for the 1099 form is recorded and accumulated. At the end of the year, 1099 forms and reports can be printed for reporting these amounts to the vendor and the IRS based on varying criteria.
As of 2022:
Step 1: Configure Vendor File
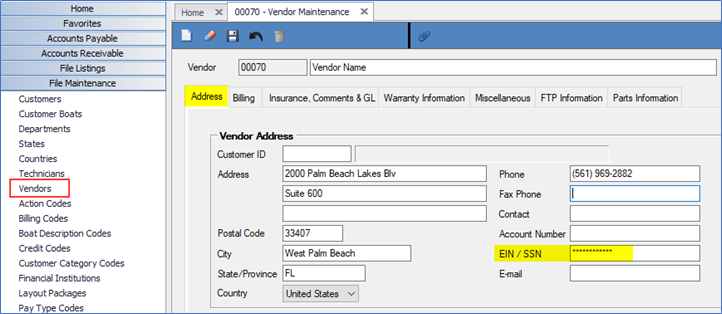
From the Menu, click File Maintenance > Vendors
- On the Address tab, enter the vendor’s EIN or Social Security number in the EIN/SSN field. This field is encrypted after it is entered but will print in full when the 1099 is printed.
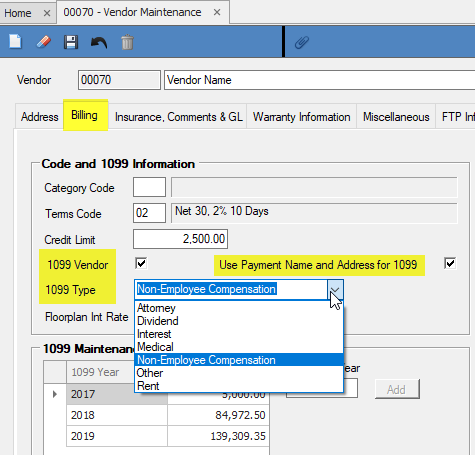
2. Go to the Billing tab.
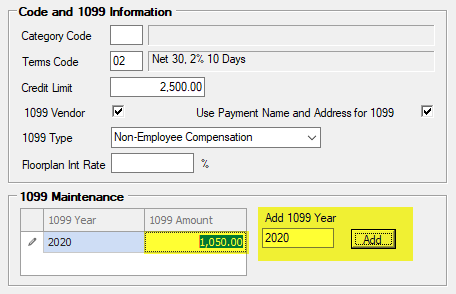
1099 Vendor – Check the 1099 Vendor box by clicking on it to track 1099 information for this vendor.
Use the Payment name and Address on the 1099 - Check this box to use the Payment address on the vendor file to print on the 1099, instead of the regular mailing address.
1099 Type – Select a 1099 type appropriate for this vendor.
1099 Maintenance – This grid is not open for editing unless the 1099 Vendor box is checked.
IMPORTANT NOTE: Unless the vendor has received payments during the year prior to being marked a 1099 vendor, this grid does not require any user input or action.
If a vendor has received payments during the year prior to being marked a 1099 vendor, the amounts paid plus any unpaid invoices that will be paid prior to the end of the year should be entered into the 1099 Amount box, as these will not be automatically added since they were entered into DockMaster prior to marking the vendor as a 1099 vendor.
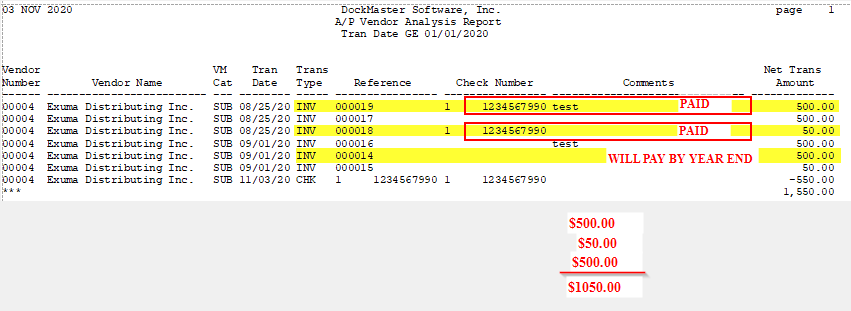
To obtain a listing of open and closed invoices for a specific vendor prior to being marked a 1099 vendor, the Vendor Analysis report should be run.
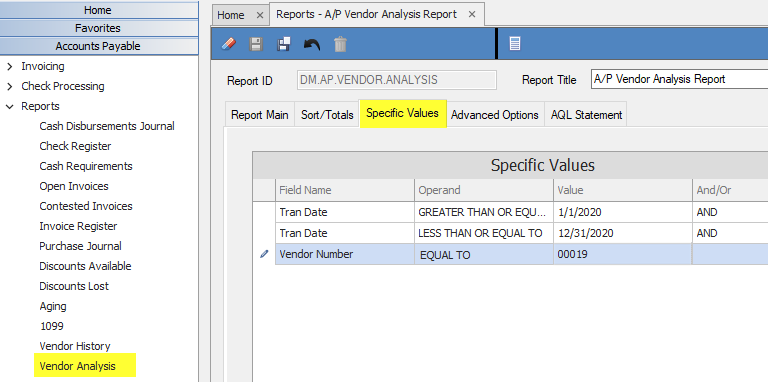
Go to Accounts Payable > Reports > Vendor Analysis.
- Click on the Specific Values tab to enter the correct time period.
- Change the Vendor Number operand to Equal To.
- Enter the vendor ID into the Value field, using the entire 5-digit number, including zeros.
Tip: Click the Save As icon to save this set up as a custom report.
Step 1: Configure Vendor File, cont’d
From the Vendor Analysis Report, manually calculate payments already made during the year, plus any amounts that will be paid by the end of the year.
UPDATE THE VENDOR 1099 MAINTENANCE GRID, if necessary:
- If the 1099 Year is not already populated in the 1099 Maintenance grid, type it into the Add 1099 Year box.
- Type the amount manually calculated as in the above example into the 1099 Amount Box:
Click the Save icon to complete the Vendor File update.
Step 2: Accounts Payable Configuration
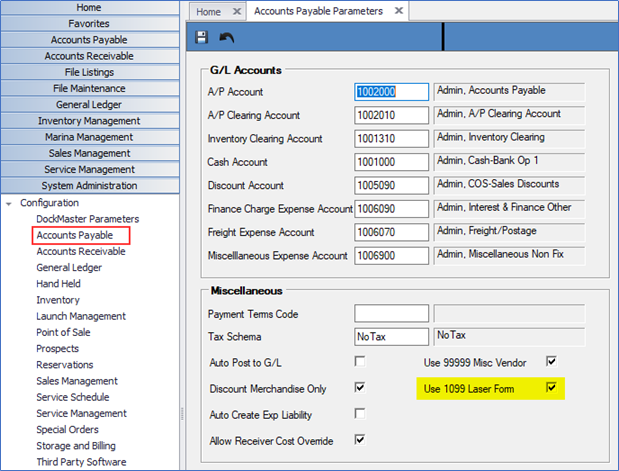
From the Menu, click System Administration > Configuration > Accounts Payable Parameters.
Use 1099 Laser Form - If the 1099s will be printed from DockMaster, check this box. This is the only format that DockMaster supports. The forms may be purchased at any office supply store.
PRINTER COMPATIBILITY NOTICE:
Step 3: Processing AP Invoices
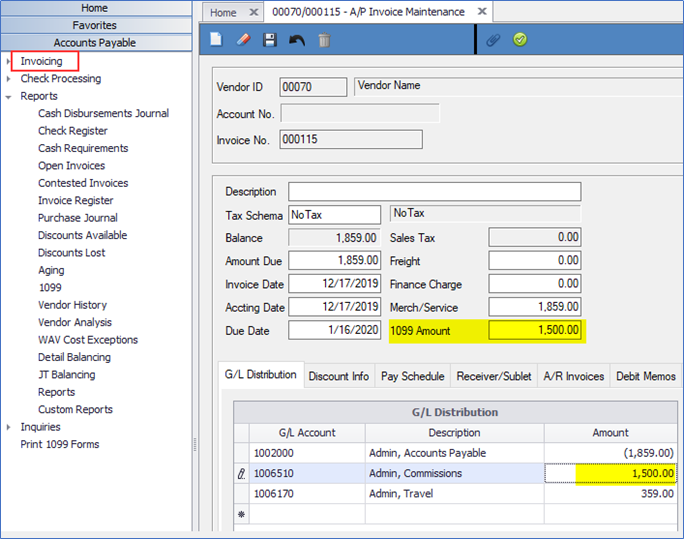
Once a vendor is marked as a 1099 vendor, new accounts payable invoices will populate an amount in the 1099 Amount field as shown below. Verify that the full amount of the invoice should be included on the 1099. If not, manually enter the amount in the 1099 Amount field.
In the example below, the invoice includes commission and travel expense, but only the commission is valid for 1099.
Step 4: Print 1099 Report
Form 1099s are printed on an annual basis and sent to the 1099 vendors. Reports can be printed from DockMaster to assist in the preparation of the IRS reporting. Before printing the actual forms, the A/P 1099 Report should be printed and reviewed for accuracy.
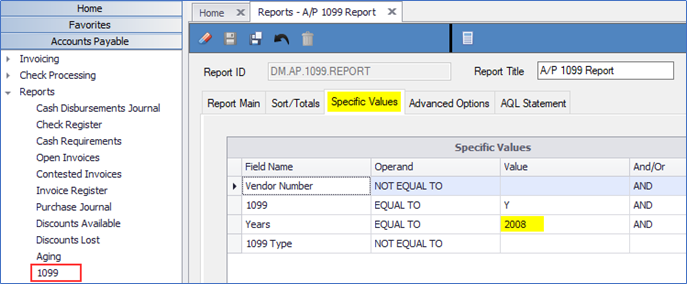
Go to Accounts Payable > Reports > 1099.
- Click on the Specific Values tab and enter the correct year. (Default is 2008)
Although the EIN/SSN Tax ID will print encrypted on this report, a blank one will alert the user that the Tax ID should be added to the vendor.
The 1099 Type codes on the report are:
• R - Rent
• O – Other
• M – Non-Employee Compensation
• A – Attorney
• I – Interest
• MD – Medical
• D – Dividend
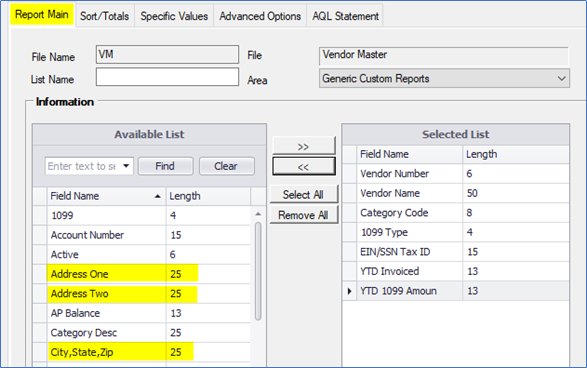
The vendor address fields can be added to the report to verify that the address is accurate and complete. Click on the Report Main tab, then double-click on the Address One, Address Two and City,State,Zip field names from the left hand column. The fields will be added to the Selected List column on the right, to be printed.
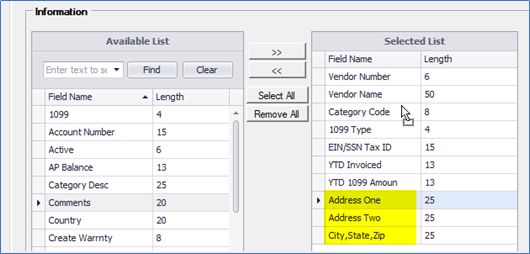
The address fields are now displayed in the Selected List, but can be moved up to the vendor name:
To move the fields within the list, click on each of the address field names and drag to the desired spot:
Adding these fields to the reports increases the width of the report, resulting in this error message:
Click Yes to continue, then when the print controller appears, click the File Options tab to export to an Excel file where the data can be viewed properly.
Step 5: Print 1099 Forms
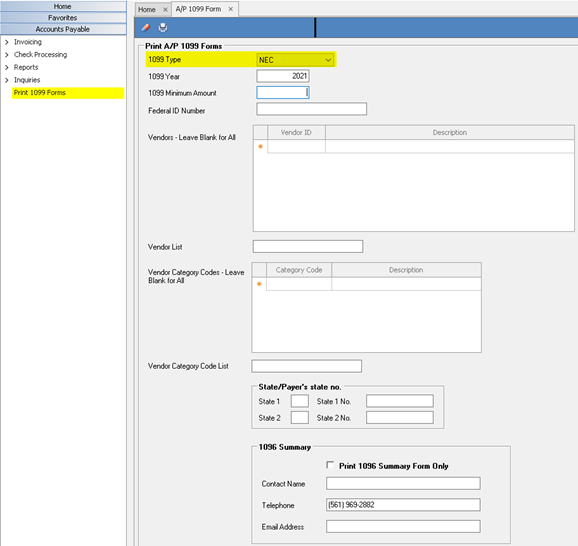
From the Menu, click Accounts Payable > Print 1099 Forms. All Form 1099s will be printed from this menu item.
1099 Type – 1099-NEC is the default. Select 1099-MISC, INT or DIV when appropriate.
1099 Year – Defaults to current year but can be changed.
1099 Minimum Amount – Required.
Federal ID Number – Required.
Vendors – Leave blank to print all vendors or enter vendor IDs for printing a selection.
Vendor Category Codes – Not required, but one or more Vendor Category Codes can be entered to print 1099s.
Payer’s State info - State Tax IDs – Not Required in DockMaster, but certain states may require it.
1096 Summary – Used only for Form 1096. Data entered here is not relevant for printing Form 1099s.
Step 6: Print 1099 Forms to printer
- Click the printer icon to open the Print Controller.
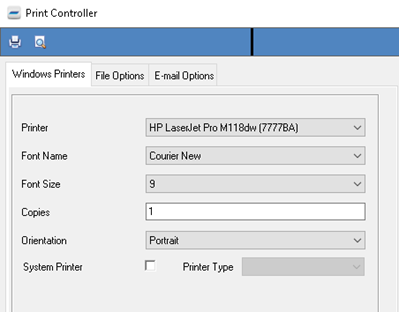
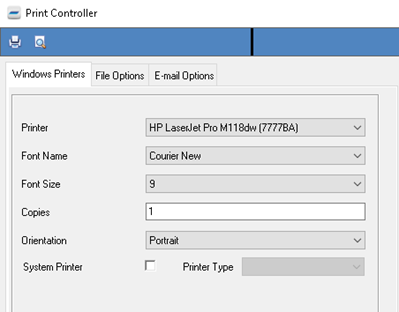
- When the Print Controller box appears, change the options to the following configuration:
Font Size 9
System Printer = Unchecked
If you wish to preview, click the Preview icon. Once reviewed, exit out of the preview.
DO NOT PRINT THE FORMS FROM THE PREVIEW.
- When ready to print on the pre-printed 1099 forms, click the printer icon again from the main screen then again on the Print Controller form:
Step 7: Print Form 1096 for each type of 1099
Form 1096 – Annual Summary and Transmission of US Information Returns is printed from the same menu item as the Form 1099.
The IRS requires a separate Form 1096 for each type of Form 1099. In DockMaster, these steps will need to be repeated for each type of Form 1099 printed.
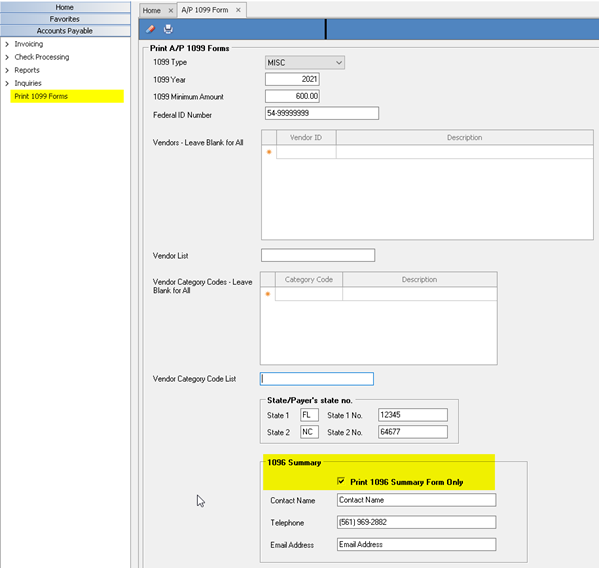
From Accounts Payable > Print 1099 Forms
Step 7: Print Form 1096 for each type of 1099, cont’d
-
Select the type of 1099 form to summarize on the Form 1096. (Only one type of form will be summarized at a time.)
1099 Year – Defaults to current year.
1099 Minimum Amount – Enter the minimum amount in order to select the same payments that were selected for each type of Form 1099.
Print 1096 Summary Form Only – Click to check.
Contact Name – Not required but will print on the Form 1096.
Telephone – From DockMaster parameters but can be edited. Prints on the Form 1096.
Email Address – Not required but will print on the Form 1096. -
Click the printer icon to open the Print Controller:
- When the Print Controller box appears, change the setup to the following configuration:
Font Size 9
System Printer = Unchecked
If you wish to preview, click the Preview icon. Once reviewed, exit out of the preview. DO NOT PRINT THE FORMS FROM THE PREVIEW.
- When ready to print on the pre-printed 1096 forms, click the printer icon again from the main screen then again on the Print Controller form:
**If at any point you run into any issues, feel free to email [email protected] for assistance.**

