Adding New Accounting Periods
Purpose: To provide information related to the configuration and addition of new accounting periods. This is typically done at the end of the year in preparation for the next year.
There are two parts to configuring new accounting periods:
- Configure General Ledger Parameters
- Configure the General Ledger Company Table
Note: All users should be logged out of the system when adding new accounting periods except for the person adding them. When updating the accounting periods in live accounts, the training account periods should also be added.
Step 1: Configure General Ledger Parameters
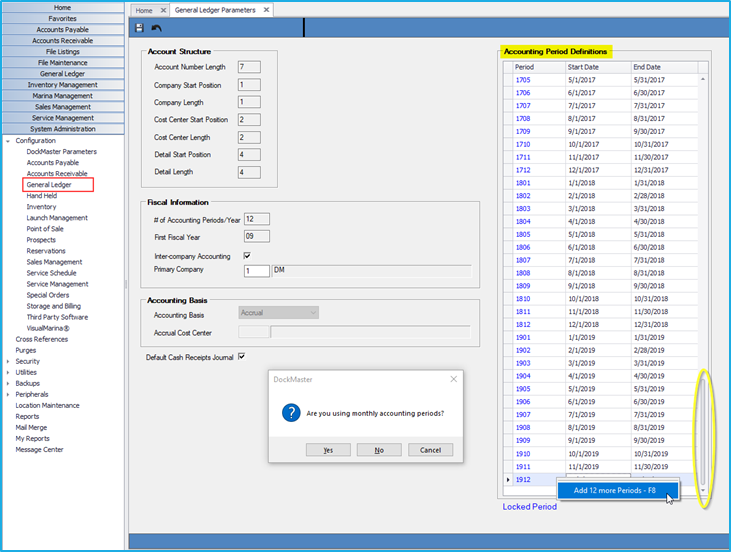
On the Menu, click System Administration > Configuration > General Ledger

- Click and drag the scroll bar on the accounting period definitions grid to the bottom. The last period defined will be at the bottom of the grid.
- Click the last period in the grid, right click and select “Add 12 more Periods - F8”.
- The “Are you using monthly accounting periods?" message will appear. Based on your account setup, answer yes if you are using monthly accounting periods or no if you are not.
- Verify the periods were added to the bottom of the Accounting Periods grid. Note you can add more than 12 periods if you prefer, but it is not recommended for control reasons.
- Save and close the form and proceed to the Company Table to update the periods for each company that has been defined in your account.
Step 2: Configure General Ledger Company Table
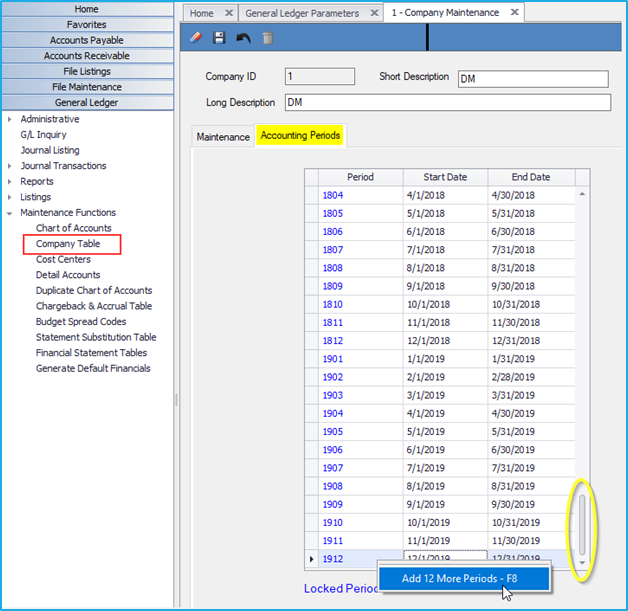
On the Menu, click General Ledger > Maintenance Functions > Company Table

- Enter the Company ID that you want to add the periods to. If you are unsure of your Company ID right click and choose F6 to get a list.
- Click on the Accounting Periods tab, click and drag the scroll bar to the bottom of the accounting period’s grid.
- Click the last period in the grid, right click and select “Add 12 more Periods - F8”.
- The “Are you using monthly accounting periods?" message will appear. Based on your account setup, answer yes if you are using monthly accounting periods or no if you are not.
- Click Save. If you have more than one company to update, repeat steps 7 through 10 above until all companies in the table are defined.
- Exit DockMaster. You must perform this step, or you will not be able to use the periods that were added.
- Log in again.
Notes:
All users should be logged off of the system when adding new accounting
periods except for the person adding them.
When you update the accounting periods in your live accounts you should also
update them in your training account.
**If at any point you run into any issues, feel free to email [email protected] for assistance.**