Creating and Using a Recurring Journal Transaction
Purpose: This document will teach the DockMaster user how to create a journal transaction that will be saved and recalled for use in future accounting periods.
A recurring journal entry is a journal entry that is recorded in more than one accounting period.
The term can refer to monthly journal entries where the accounts are identical, but the amounts vary by month. Typically used for accruals, depreciation and amortization, recurring entries can also be used for payroll, insurance, interest, bank charges, etc.
Step 1: Create New Journal Entry
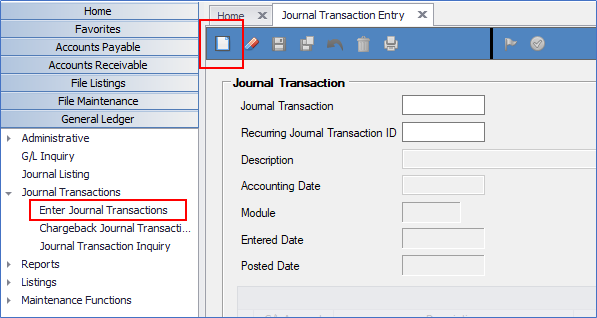
From the Menu, click General Ledger –> Journal Transactions –> Enter Journal Transactions
- Click on the New Document Icon
-
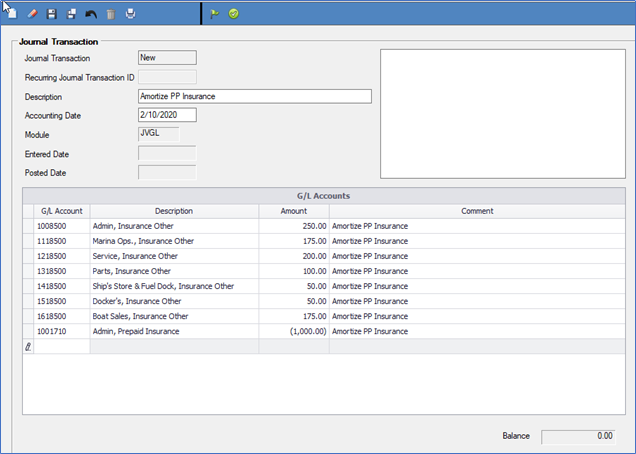
Enter descriptive verbiage for the journal transaction. You can change the Description each time you use this journal transaction, if necessary.
-
Tab over the Accounting Date, as it defaults to the date you are creating this record. You can change the Accounting date each time you use this journal transaction.
-
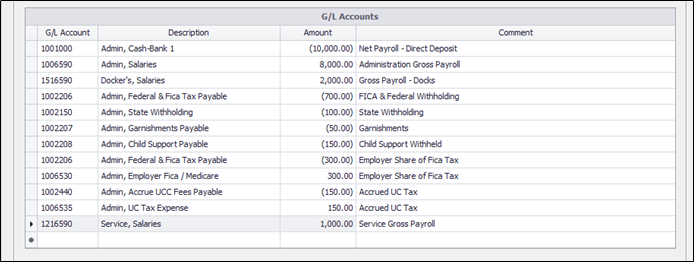
Enter the General Ledger account numbers you will be using into the grid. Consider the best order for these, as you will not be able to insert a row once entered.
NOTE: When creating this transaction, you may enter 0.00 in the Amount fields and change Comments as necessary:
Step 2: Save Journal Entry as Recurring
-
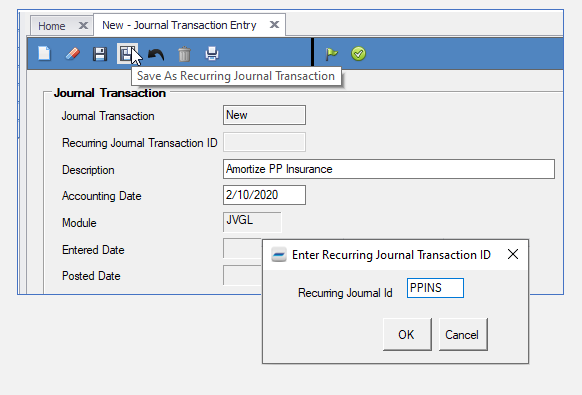
After all entries have been keyed, click on the “Save As Recurring Journal Transaction” icon at the top (4th icon) to save the Recurring Journal Transaction.
-
Type up to 6 digits to assign a descriptive alpha or alpha-numeric ID. Click OK.
Step 3: Changing a Recurring Journal Entry
Recurring journal entries may need to be changed periodically. Additional general ledger accounts may be added to the journal transaction, and line items removed. However, if you want the additional lines to continue to display on the recurring journal entry, you will need to “resave” the recurring journal transaction.
If you made changes that you want to save to the recurring JT template, click the Floppy Disc icon with the page on top of it and re-enter the ID number of the original recurring journal entry.
Step 4: Selecting and Posting a Recurring Journal Entry
-
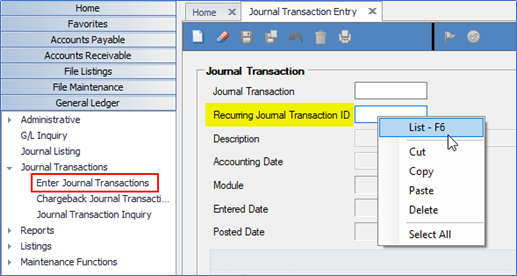
To create a journal entry using this recurring transaction, go to General Ledger –> Journal Transactions –> Journal Transaction Entry.
-
Press F6 in the Recurring Journal Transaction ID box for a list of recurring transactions.
-
Select one to populate the screen. Change the Description of the entry and the Accounting Date, if required. Verify or update the dollar amounts.
-
Click the Save icon to create a new journal transaction ID. Click Ok. At this point, a new journal transaction has been created. It has not been posted.
-
To post the entry from this screen, click the green check icon.
-
To suspend the transaction, click the green flag icon. Otherwise, the transaction will post when the ‘Post to Subsidiary Journals to GL’ process is run.
Step 5: Deleting a Recurring Journal Entry
To delete a recurring JT that you are no longer using, select the recurring JT record in the Journal Transaction entry screen, then click the Trash Can icon.
**If at any point you run into any issues, feel free to email [email protected] for assistance.**
